
10 mins read
Overview
This article walks you through the complete FieldAx quoting journey for Airquip: creating a quote from an Account, reviewing pricing and profitability, sending the quote to your customer, and – once it’s approved — automatically creating an Order and allowing you to create and schedule a Job, with no unnecessary extra data entry.
Quick Summary
- Open the Account record and click Create Quote.
- Enter the Quote Name, Contact, Opportunity (optional), and add products, then Save.
- Click Start Sync to synchronize the Quote and Opportunity.
- Add a Scope of Work, then preview and send the quote to your customer.
- Once the Quote is Approved, the Opportunity is set to Closed Won and an Order is created automatically.
- A pop-up lets you create and schedule the Job directly from the approved Quote.
Step 1: Start a New Quote from the Account
Open the Account record for your customer and click Create Quote in the top-right corner. You can also find the same button on the Accounts list view if you prefer to start from there.
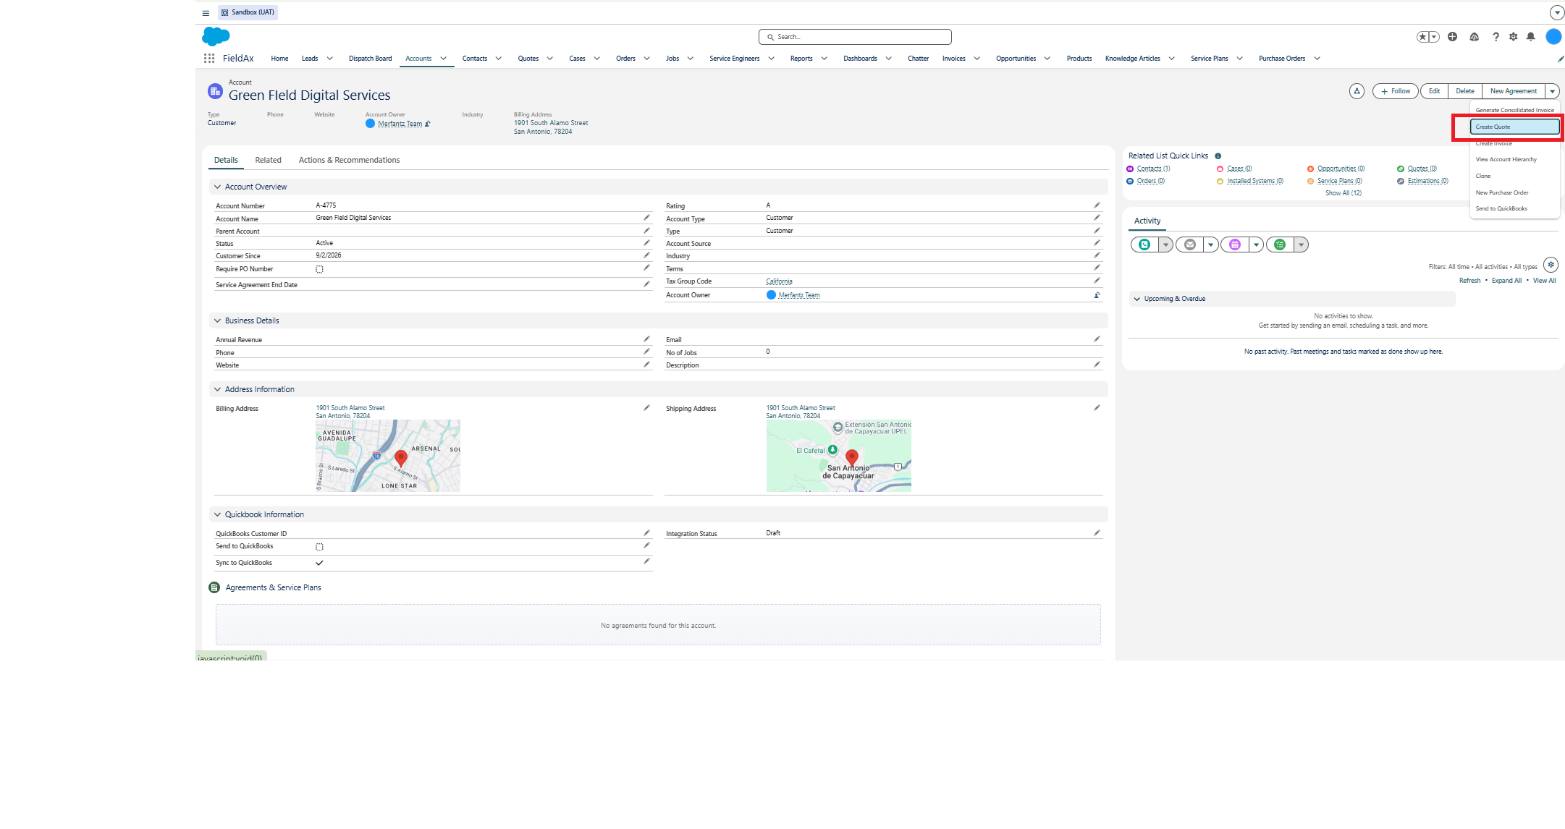
Create Quote, available directly from the Account page.
Step 2: Enter the Quote Details
A Quote Generation Console pop-up opens. Fill in the details:
- Quote Name: Auto-fills from the Account name — you can edit it if needed.
- Account: Already filled in based on the Account record you started from.
- Contact: Search and select an existing Contact, or click Create Contact to add a new one without leaving the screen.
- Opportunity: Leave as Create new Opportunity, or select an existing Opportunity from the dropdown.
- Email / Description: Optional — add any additional details for your team.
- Line Items: Click + Add Item, search by product name, code, or description, then click Add Selected.
Once everything looks correct, click Save.
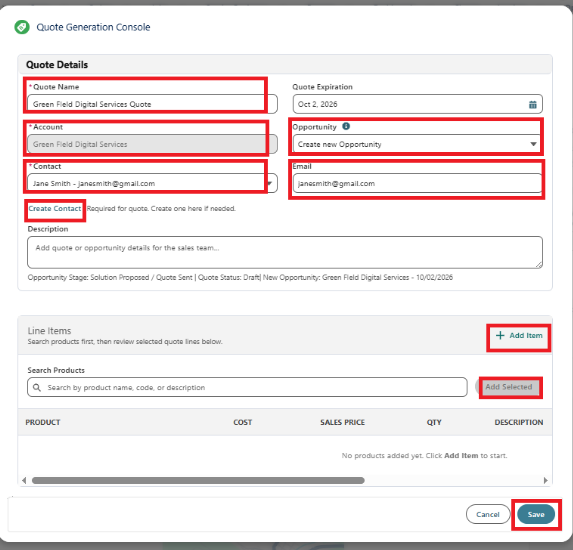
The Quote Generation Console — everything you need to build a quote in one screen.
Step 3: Review Line Items, Cost & Profitability
After saving, you land on the Quote record. Here you can review and, if needed, adjust the details before sending it to your customer:
- Quote Line Items: Review the product, description, quantity, unit cost, unit price, and calculated GP $ / GP % (gross profit). Click the pencil icon to edit any row.
- Internal Profitability Summary: Review Material Cost, Labor Cost, Travel Cost, Total Selling Price, Gross Profit, and Gross Profit %. This information is for your team’s internal use and is not shown to the customer.
- Labor & Travel Estimate: Review the Estimated Labor Hours and Cost, Estimated Travel Hours and Cost, and Estimated Total Cost.
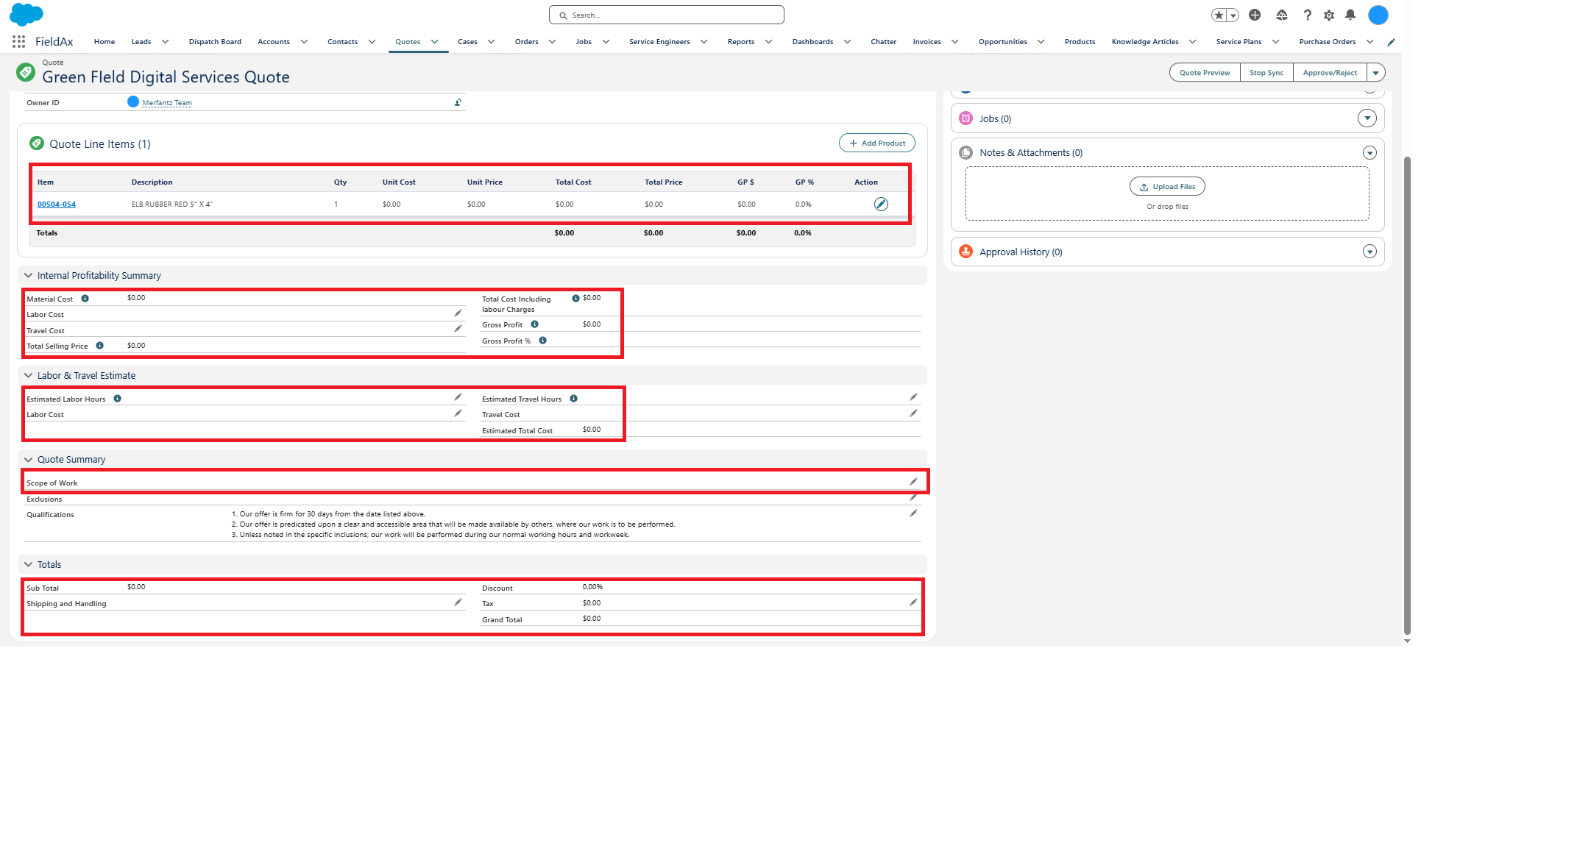
Quote Line Items, Internal Profitability Summary, Labor & Travel Estimate, and Totals — all on one page.
Step 4: Sync the Quote with the Opportunity
Click Start Sync in the top-right corner of the Quote page.
The Quote and Opportunity can both contain line items and other related information. When you click Start Sync, the two records are synchronized so that they stay aligned and reflect the same information.
Any applicable changes made to the Quote or Opportunity can be synchronized, helping ensure that the line items and relevant information remain consistent between both records.
Note: You can add or update line items on both the Quote and the Opportunity. Use Start Sync to synchronize the records and bring them into alignment.
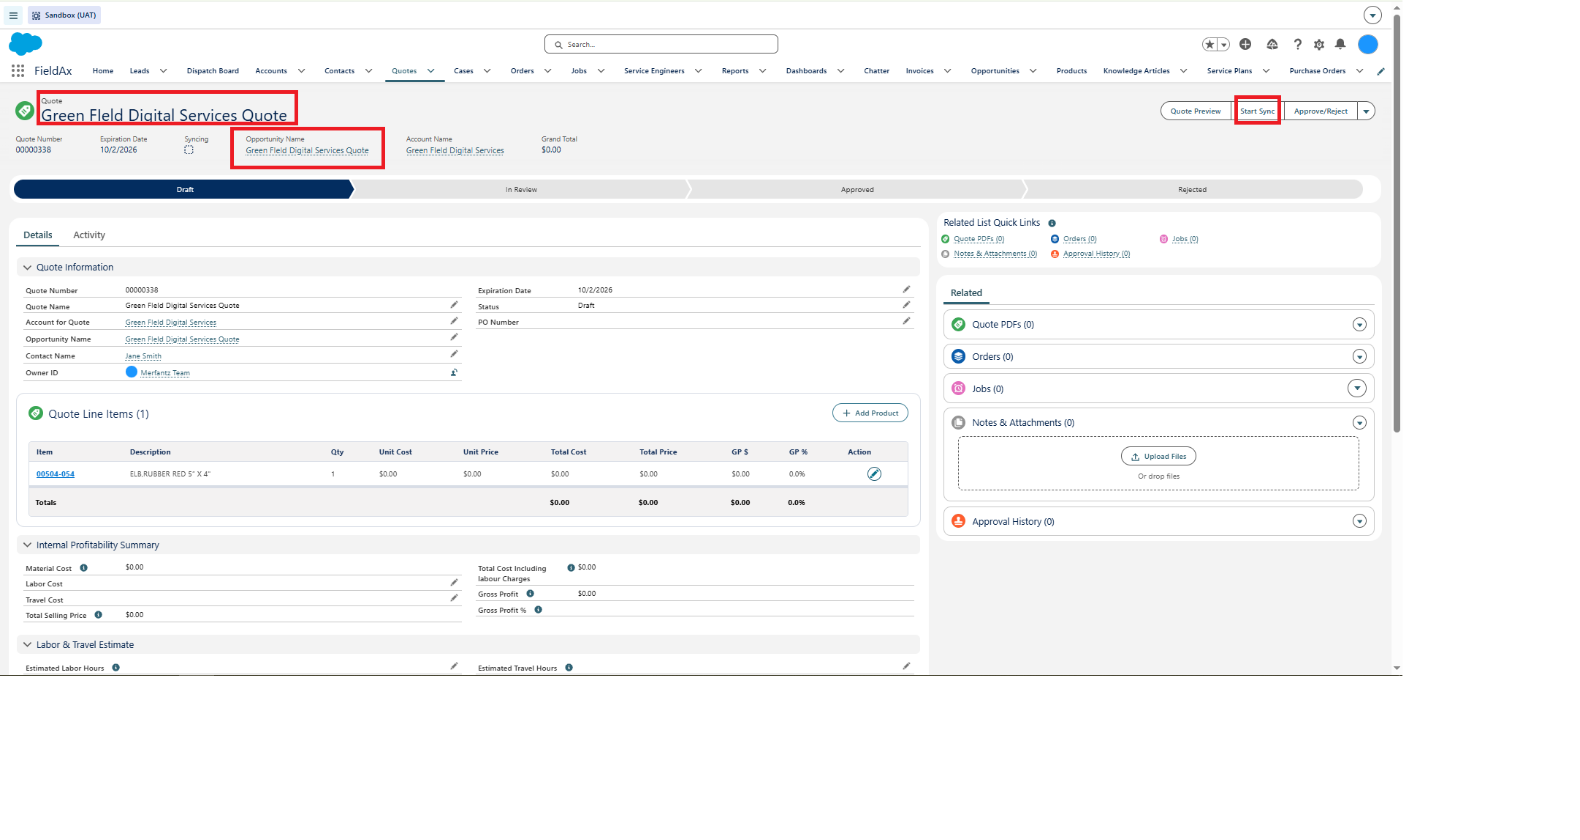
Start Sync, in the top-right corner of the Quote page.
Step 5: Add a Scope of Work
Before sending a quote to a customer, add a short Scope of Work. This turns a plain, itemized quote into a clean, proposal-style summary.
- Scroll to the Quote Summary section.
- Click the pencil icon next to Scope of Work.
- Enter a short description of the work to be completed, then click Save.
- Optionally, review or edit the Exclusions and Qualifications shown below it.
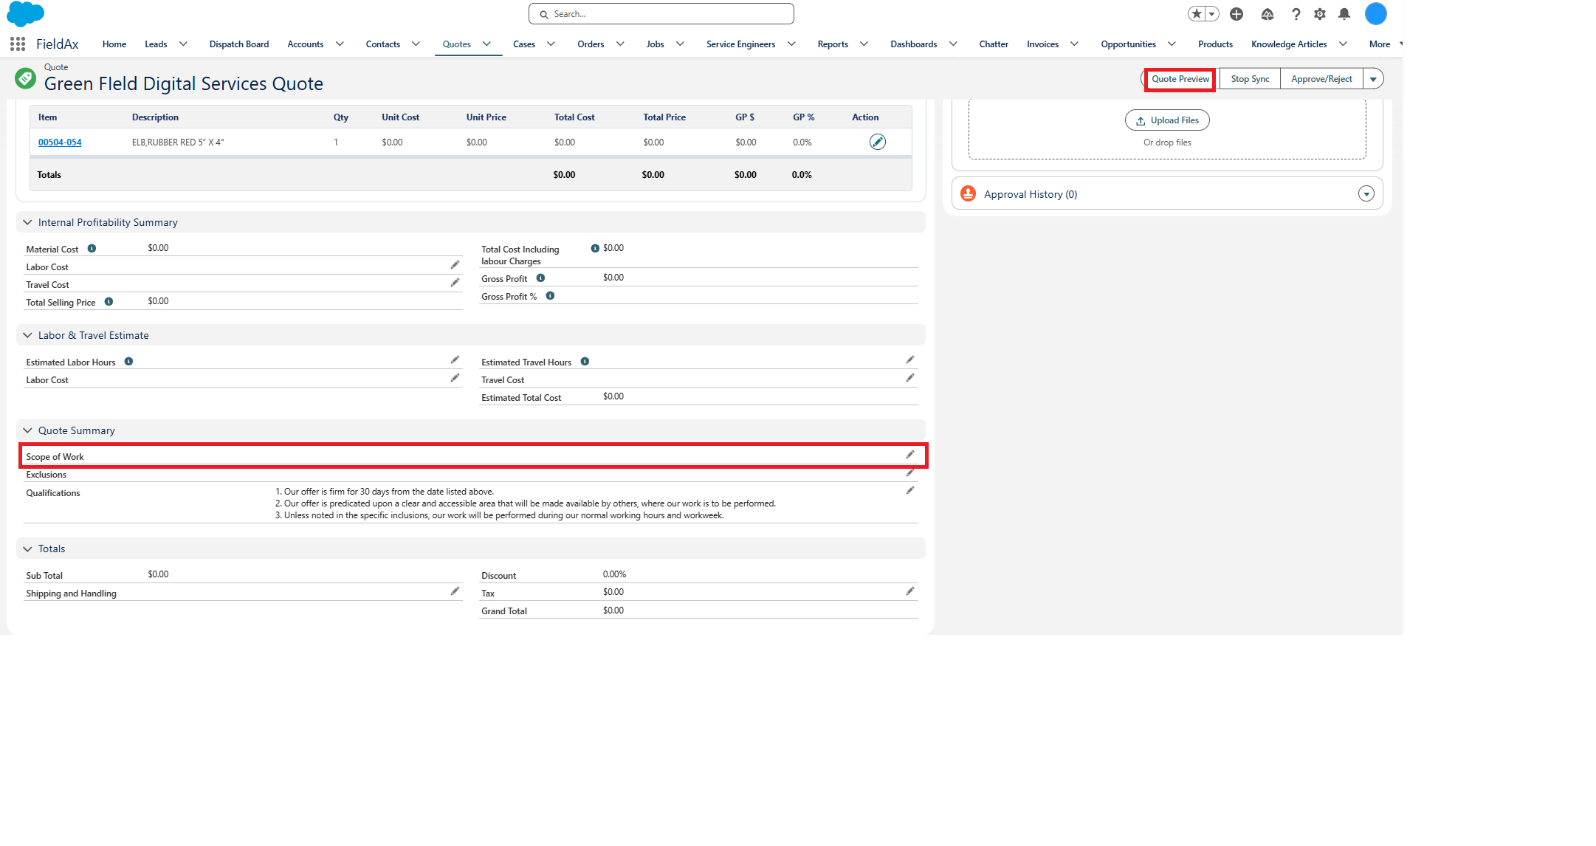
Scope of Work and the Quote Preview button.
Step 6: Preview & Choose a Quote Format
Click Quote Preview. A Select Quote Format window opens with two choices:
- Quote Summary: A clean, proposal-style layout showing your Scope of Work, Qualifications, and totals only — no line-by-line pricing.
- Quote Preview: The full, itemized quote showing every product line and its price.
Select the format you want and click Preview Quote.
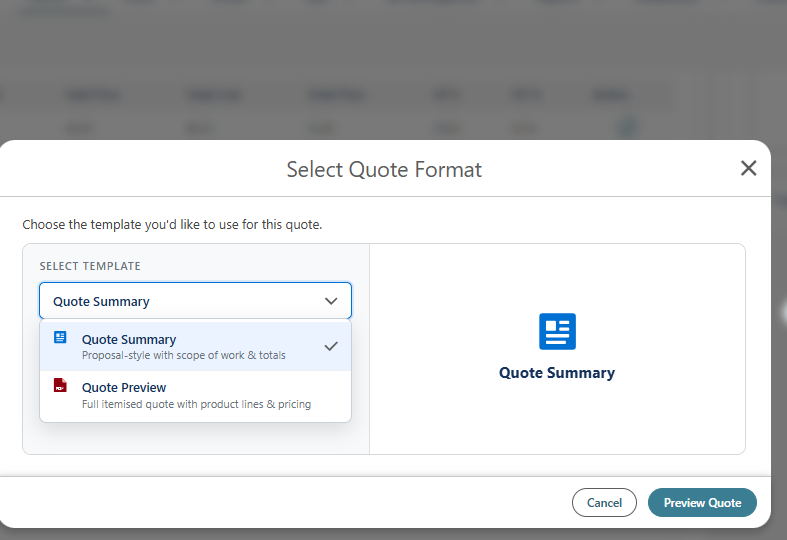
Choose between Quote Summary and Quote Preview.
Step 7: Save and Send the Quote
The PDF opens for a final review. From here, you can exclude tax if it isn’t needed, then choose one of the following:
- Save Quote: Saves the PDF to the Quote record.
- Save & Send Quote: Saves the PDF and opens an email ready to send to your customer.
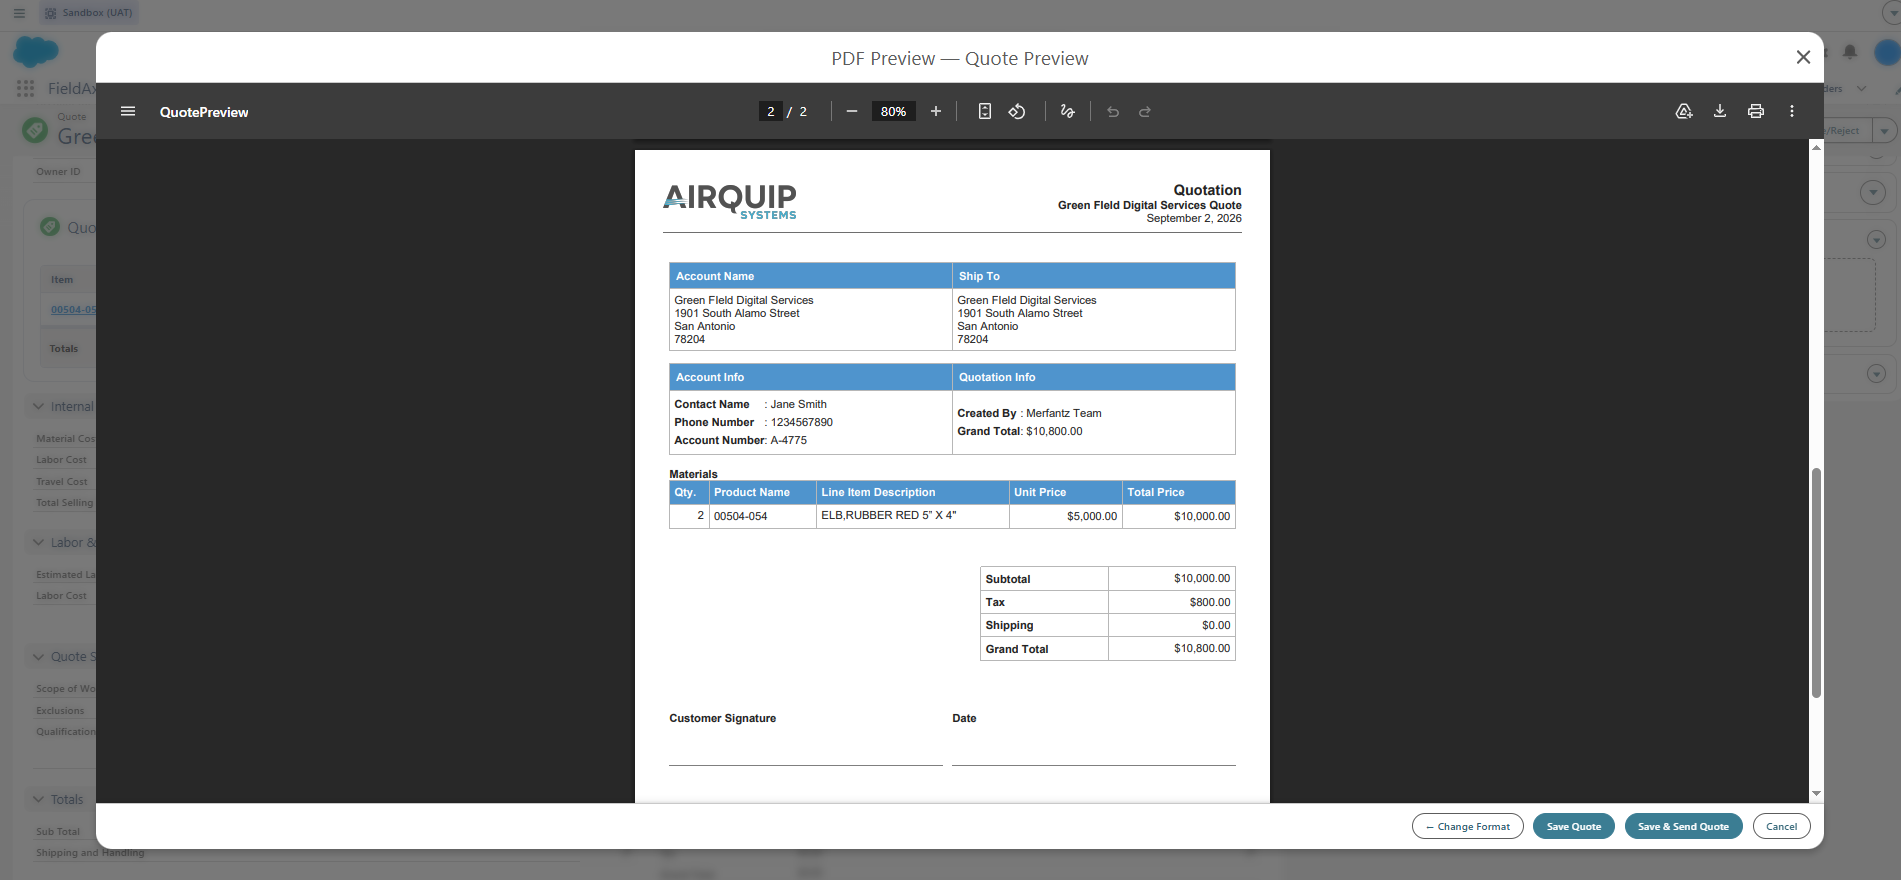
Example: the Quote Preview PDF, branded for Airquip Systems.
If you choose Save & Send Quote, FieldAx opens a Send Quote Email window with the From address, customer’s email, subject, and a ready-to-use message already filled in. The quote PDF is also attached.
Review the email and click Send Email.
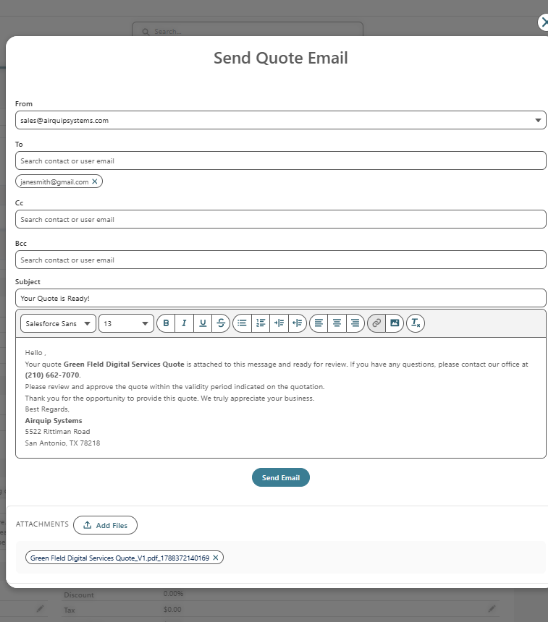
The Send Quote Email window, with the quote PDF already attached.
Step 8: Approve or Reject the Quote
Once your customer has agreed to the quote, click Approve/Reject in the top-right corner of the Quote page. The same button is used for both actions.
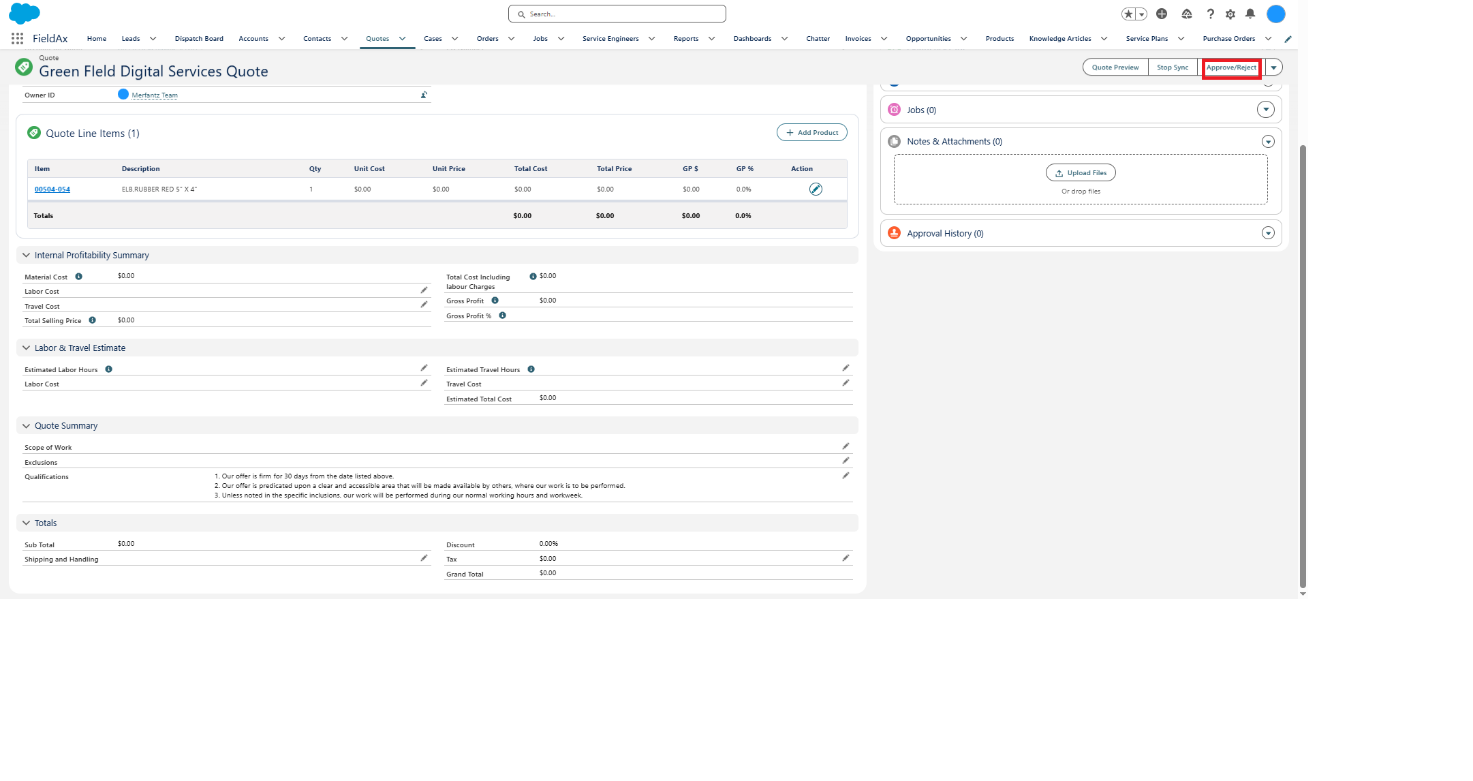
The Approve/Reject button on the Quote page.
A Quote Decision window asks whether you want to approve or reject the quote.
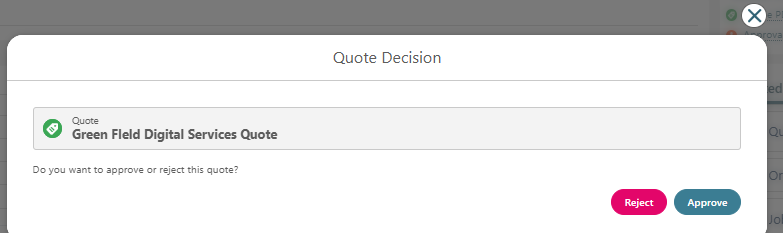
Choose Approve or Reject for the quote.
- Approve: The linked Opportunity is automatically set to Closed Won, and an Order is created automatically — no manual Order creation is required.
- Reject: Select a Stage such as On Hold / Future Follow-Up or Closed Lost, add optional Notes, and click Submit.
Note: You never need to create the Order yourself. As soon as a Quote is Approved, FieldAx creates the Order automatically.
Step 9: Create and Schedule the Job
As soon as the Quote is approved, a Create Job from Approved Quote pop-up appears.
- Fill in the required fields: Job Category, Priority, Status, and Contact.
- Set the Planned Date and Time.
- Click Create Job.
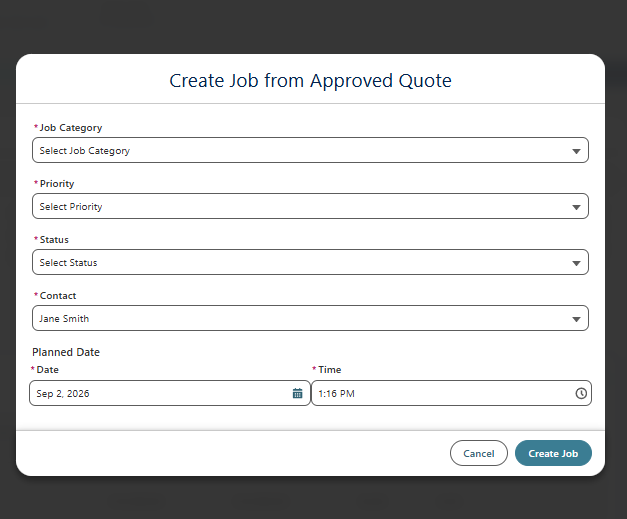
Create Job from Approved Quote.
You’re then taken to the Job Scheduling calendar, where you can select a Technician and time slot:
- Search for the engineer you want to assign in the Search Engineer box.
- Click and drag on their calendar row to set the date and time for the job.
- Once scheduled, choose Open Job to review the new Job record, or Close to return to the Quote. (Note: Cancel option to close the Quote without scheduling Job, still Order creates automatically)
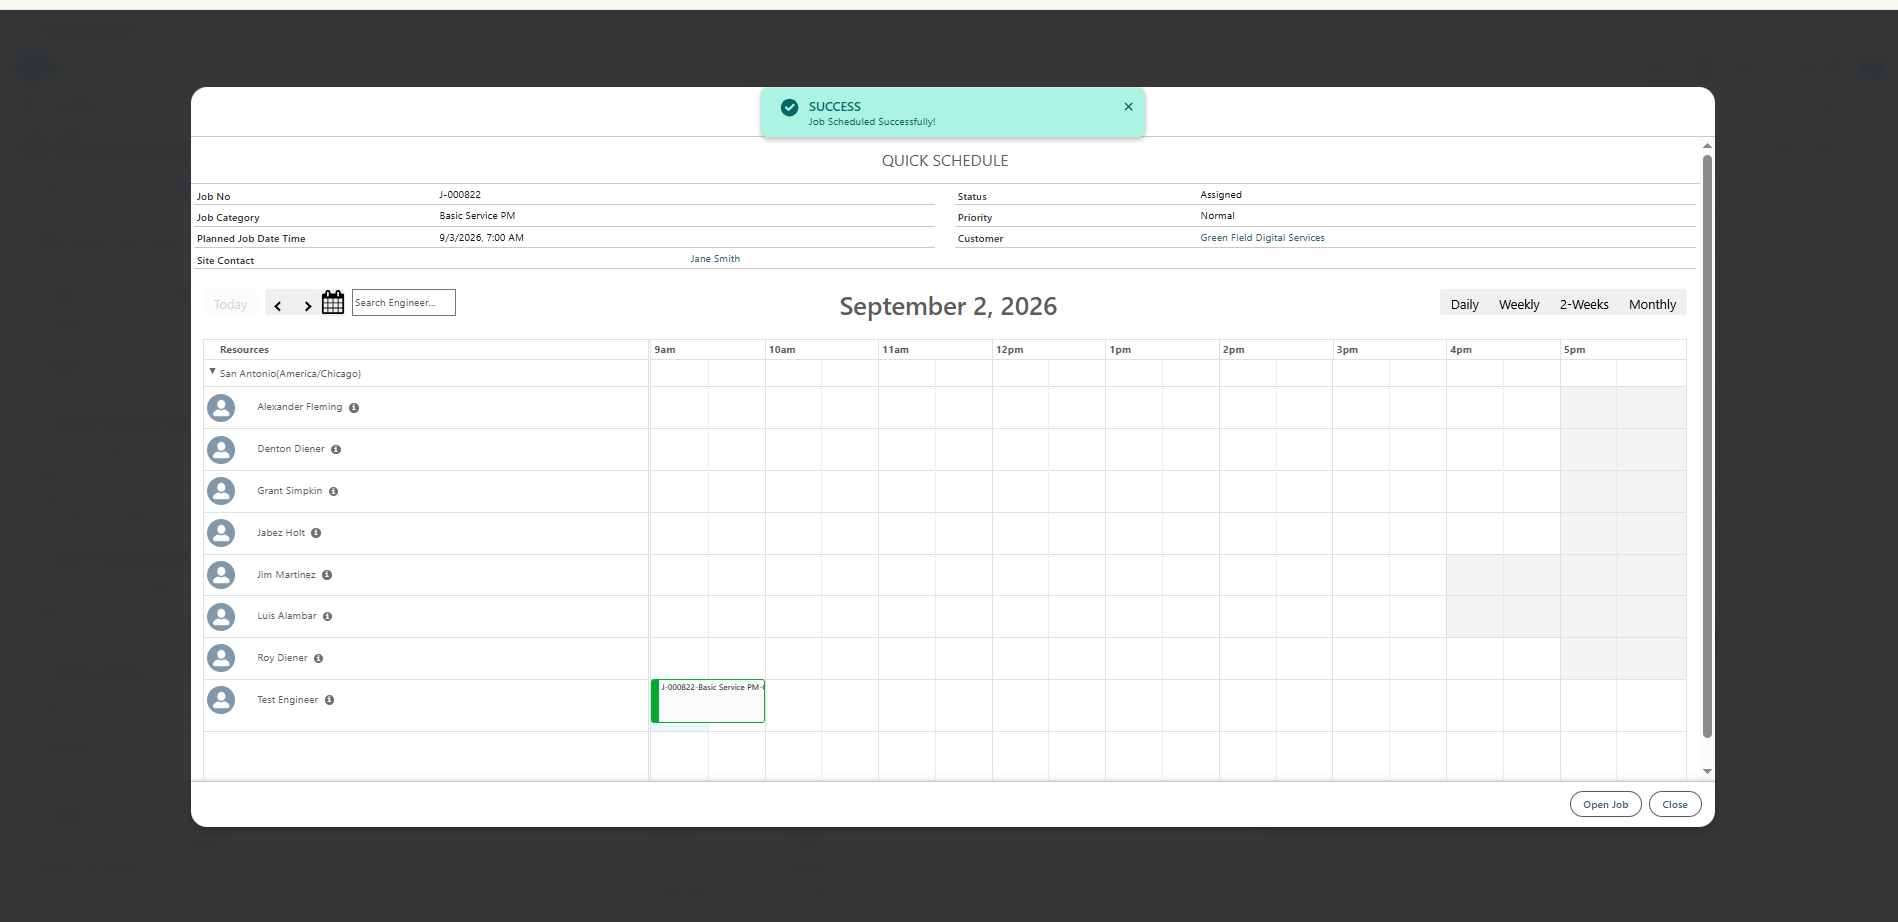
Job Scheduling — assign a technician and time slot, then confirm.
Note: Creating the Job directly from the approved Quote means you do not have to build the Job manually. The process takes you from the Quote through approval and Order creation to Job creation and scheduling in one flow.
Quick Reference: Creating Records Manually
Most of the time, FieldAx creates records for you automatically as part of this flow. If you ever need to create one manually, here’s where to go:
| Record | How to Create It Manually |
|---|---|
| Account | Go to the Accounts tab and click New. |
| Contact | Go to the Contacts tab and click New. |
| Quote | Use the Create Quote button from an Account record. |
| Opportunity | Go to the Opportunities tab and click New. |
| Case | Go to the Cases tab and click New. |
| Order | Go to the Orders tab and click New. This is only needed if the Order is not automatically created. |
| Job | Go to the Jobs tab and click New. |
| Invoice | Go to the Invoices tab and click New. |
Related Articles
- Order-to-Invoice Flow: Generating an Invoice directly from an approved Order.
- Quote Line Items: Editing product cost, price, and quantity on a Quote.
- Product Search: Finding the right product faster while building a Quote.