
Job Required Parts – On the Go parts
What this feature does
The “Job Required Parts” button on a Job lets an engineer record which parts were used to complete that job. It gives two options:
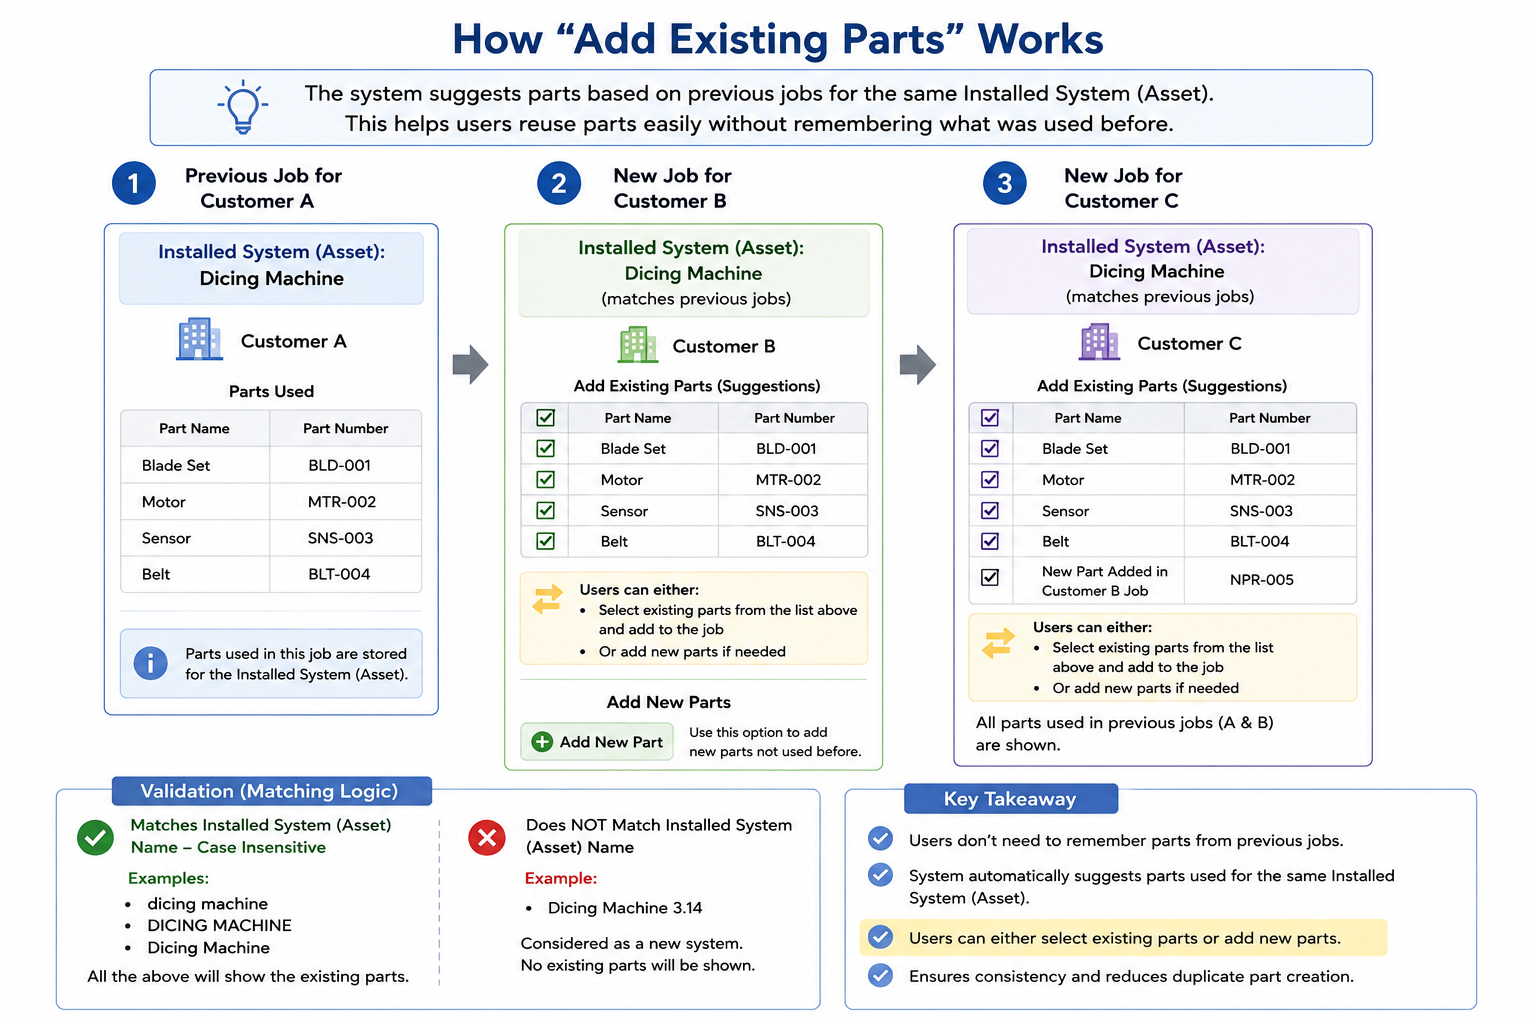
- Add Existing Parts — pick from parts that were already used on earlier jobs for this same Installed System.
- Add New Parts — enter a part that hasn’t been used before.
This document explains the “Add Existing Parts” path, since that’s the one used most often.
Step-by-step
- Open the Job record and click “Job Required Parts” (top right of the page).
The “Job Required Parts” button on the Job page.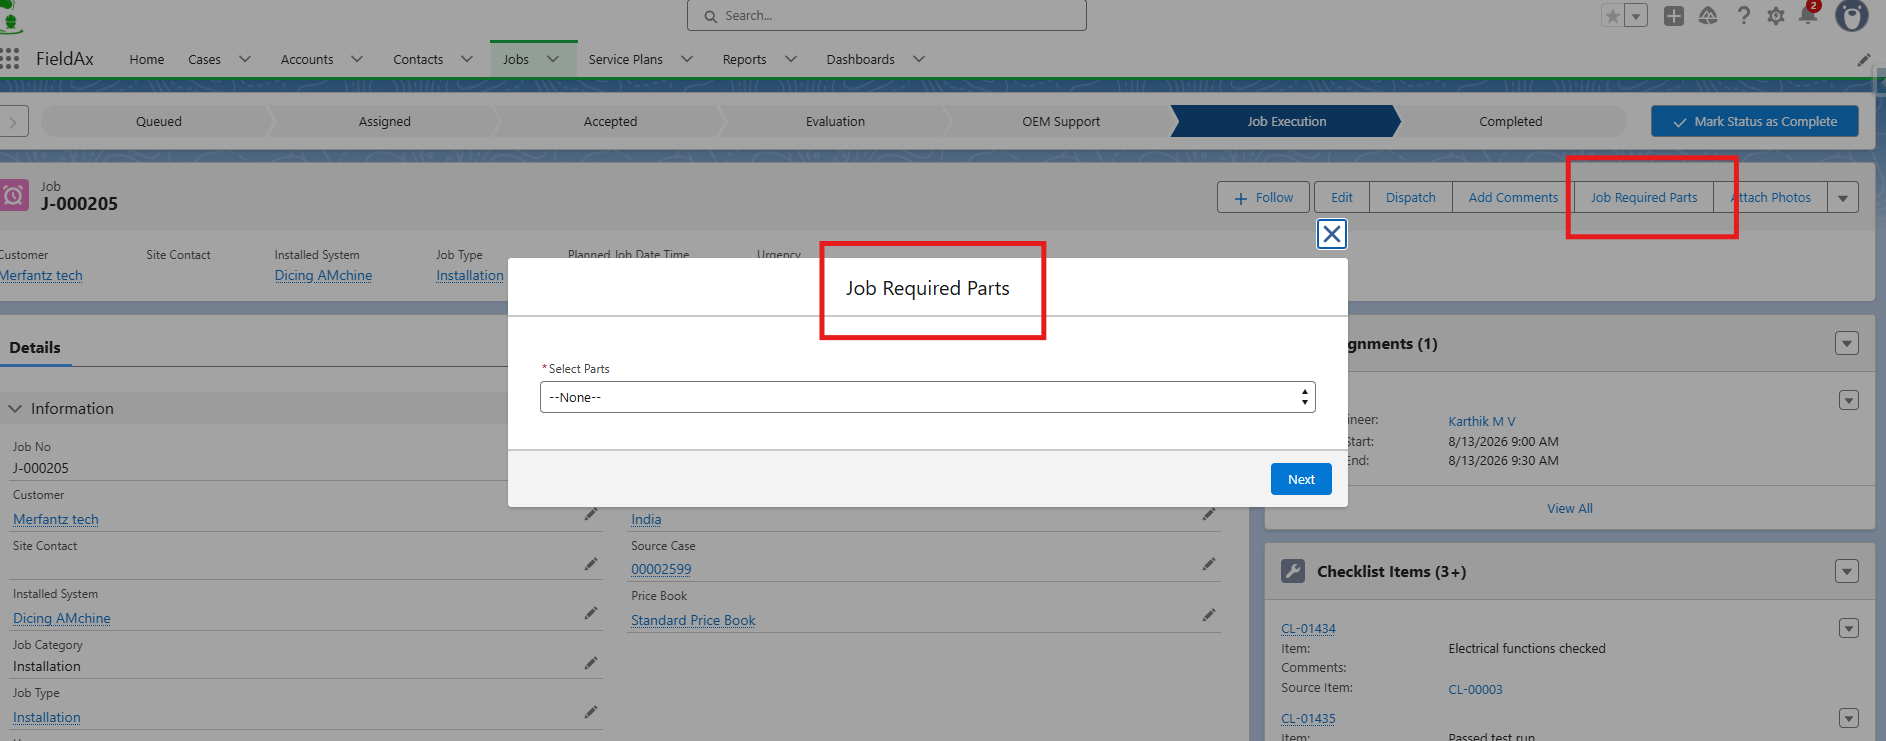
- A window titled “Job Required Parts” opens. Click the “Select Parts” dropdown and choose “Add Existing Parts”.
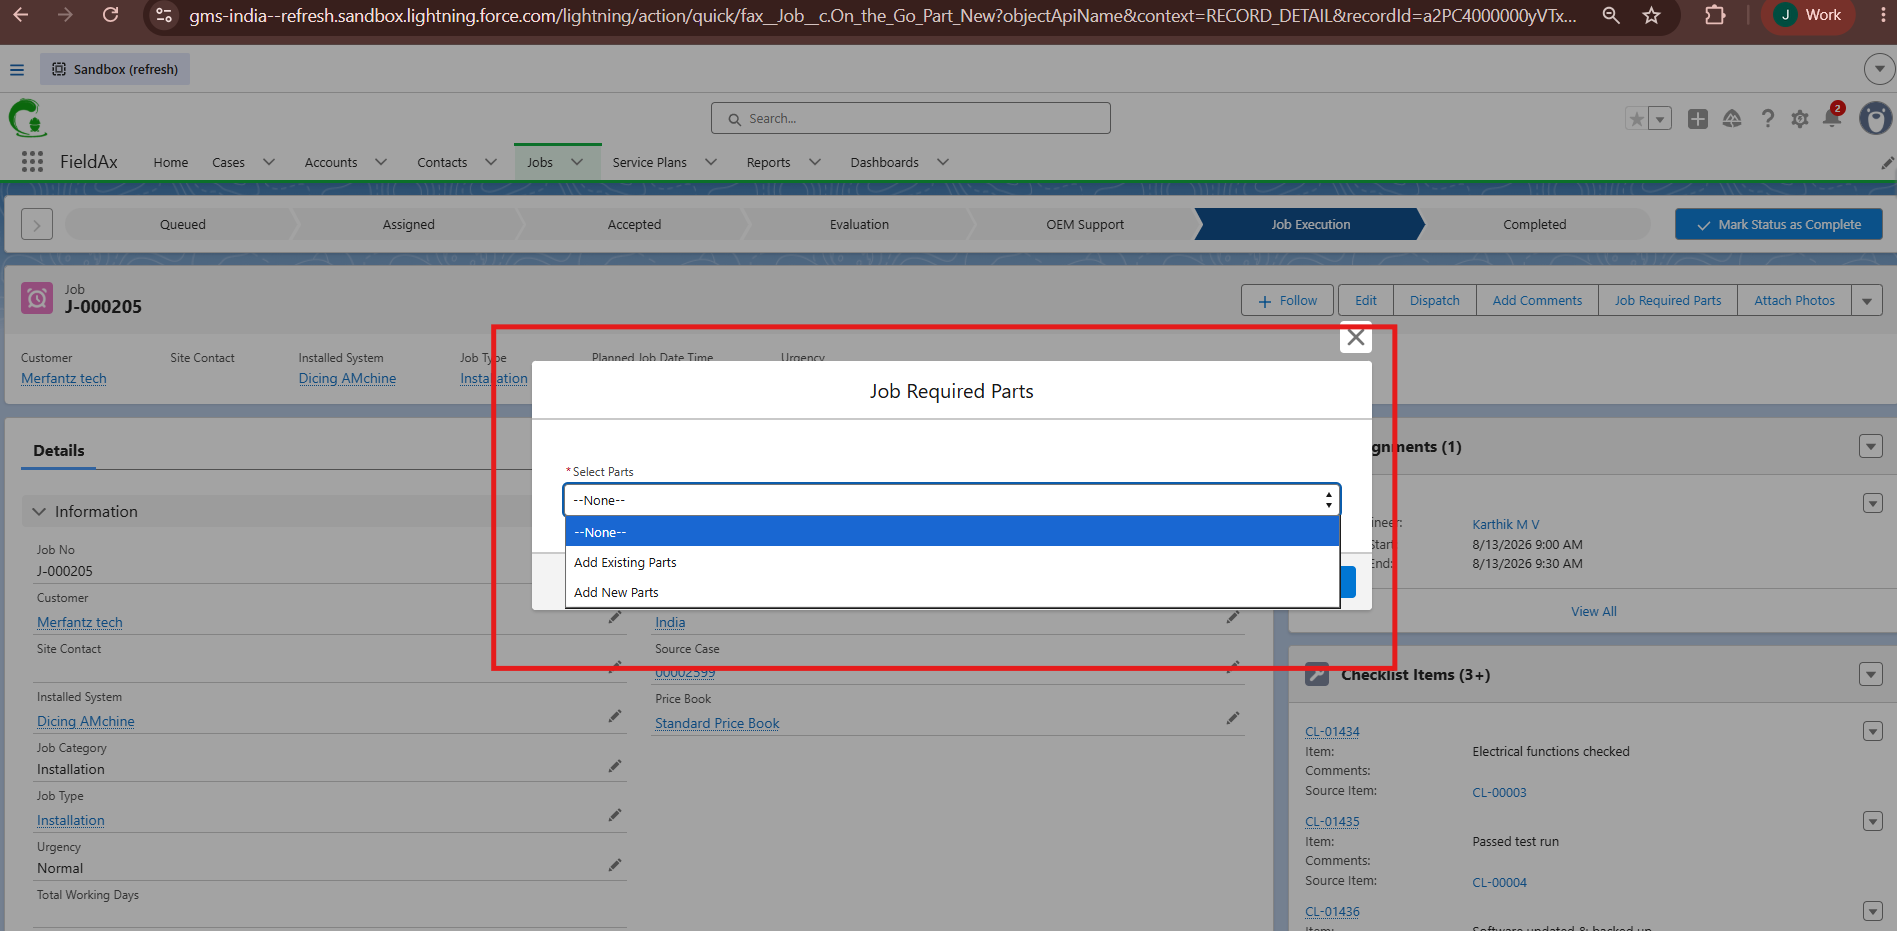
Choosing “Add Existing Parts” from the Select Parts dropdown.
- A list called “On the Go Parts” appears. It shows every part that was used on any earlier job for this Installed System, along with:
- Part Name and Part Number — what the part is.
- Quantity Used — how many of this part were already recorded as used, before this job.
- Quantity Needed — an editable box where you type how many you’re using on this job.
- Sourced From — where the part came from (OEM, GMS, or Customer).
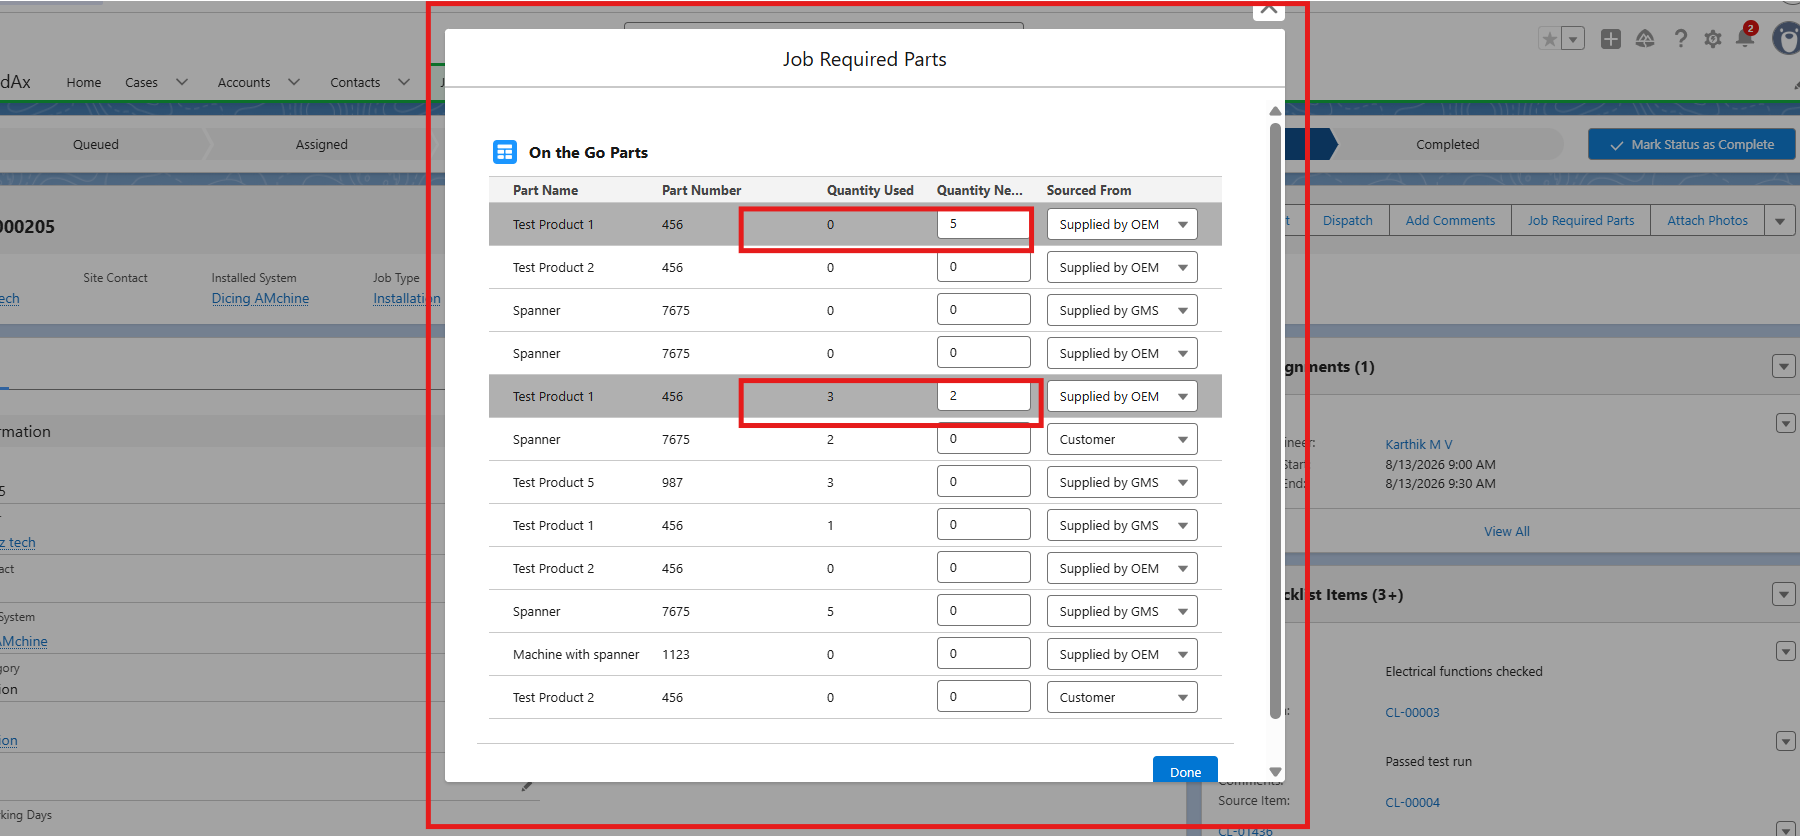
The On the Go Parts list, with Quantity Used and Quantity Needed columns.
Understanding “Quantity Used” vs “Quantity Needed”
These two numbers can be confusing at first, so here are two real examples from the screenshot above.
Example 1 — a part not used before in this job( But used in another job)
| Row: Test Product 1 (Part Number 456)
Quantity Used = 0 → this part has never been recorded as used in this job ( but it was used on a previous job.) Quantity Needed = 5 → I am now entering 5, meaning I am using 5 of this part on this job. |
Example 2 — a part already used, and more is needed
| Row: Test Product 1 (Part Number 456), a different row in the list
Quantity Used = 3 → 3 of this part were already recorded as used on this job earlier. Quantity Needed = 2 → I am now adding 2 more, on top of the 3 already used. |
In short: Quantity Used is a record of what’s already been consumed. Quantity Needed is what you type in now to add to that record — it does not overwrite the existing quantity, it adds to it.
Deployment Checklist for On the go parts:
Schedule:
| Start Date | Time |
| 11 – 09 – 2026 | Start time: 9:30 AM |
| 15 – 09 -2026 | End time: 6:30 PM |
*Disclaimer: The deployment timeline is subject to change in case of unforeseen bugs, technical issues, or requirement changes.
COMPONENTS FOR INSTALLATION:
- Source Control Update Completed: Yes/No
- Data Backup: Not Applicable
- Code Coverage: / Applicable
- Code Review Completed: Yes/No
- Deployment Method:
✔ Changeset
❑ Salesforce CLI
❑ Ant Migration Tool
❑ Manual Record Creation/ Updation
- Deployment Sequence
| Step | Component Type | Component Name | Comments | |
| 1 | Screen Flow | On_the_Go_Part_Flow |
|
|
| 2 | Record Trigger flow | Job_Required_Parts_Before_Create_Update_Flow, CreateJobItemFromOnTheGoPart, Delete_Job_Item_When_On_the_Go_Parts_is_Deleted |
||
| 3 | Buttons | On_the_Go_Part_New – Job |
||
| 4 | Custom fields | Job Item (fax__Job_System__c ) – Part_Number__c, Product_Name__c, Quanity__c, Source__c Job Required Part (On_the_Go_Part__c): Installed_System__c, Job__c, Job_Item_Id__c, Part_Number__c, Product_Name__c, Quanity_Newly_Added__c, Quantity__c, Sourced_From__c, System_Name__c, Unit_Price__c,Source – Job Item field |
||
| 5 | LWC | JobRequiredPartsLwc | ||
| 6 | Custom Object | Job Required Part (On_the_Go_Part__c) | ||
| 7 | Tab | On_the_Go_Part__c |
- Post-Deployment Steps
o Not Applicable
| Post Deployment Checklist | ||
| Checklist Items | Completed/Not Applicable/Skipped | Comments |
| Apex Classes and Triggers: | ||
| 1. Test Execution: Run critical test classes to ensure the basic functionality of new or updated Apex code. | ||
| 2. Monitoring: Set up debug logs and basic monitoring to track performance and errors. | ||
| 3. Documentation: Update developer documentation for deployed Apex classes and triggers. | ||
| Workflows, Processes, and Flows: | ||
| 1. Activation and Validation: Activate critical workflows, processes, or flows and verify their behavior. | ||
| 2. Basic Integration Validation: Confirm basic functionality of process automation involving external systems. | ||
| 3. Error Handling: Ensure basic error handling is in place for critical workflows and processes. | ||
| 4. Flow Versions Check: Make sure only the latest 2 versions of flows exist in Prod. (Delete other versions of the flow.) | ||
| Lightning Components and Visualforce Pages: | ||
| 1. Accessibility Verification: Confirm that UI components are accessible and functional. | ||
| 2. Basic Functionality Testing: Manually verify critical functions on Lightning components and Visualforce pages. | ||
| 3. Documentation: Ensure user documentation reflects changes related to UI components. | ||
| Reports and Dashboards: | ||
|
1. Validation: Verify the accuracy of critical reports and dashboards in the production environment.
|
||
|
2. Permissions: Review and set permissions for critical reports and dashboards.
|
||
|
3. Documentation: Update user documentation for key reports and dashboards.
|
||
| Data Migration and Integration: | ||
|
1. Data Validation: Validate critical data migrated or integrated post-deployment.
|
||
|
2. Basic Integration Testing: Confirm basic data flow between Salesforce and integrated systems.
|
||
|
3. Backup and Recovery: Ensure basic data backups and recovery procedures are in place.
|
||
| Security and Permissions: | ||
|
1. Permission Sets and Profiles: Review and update permissions for new or modified components.
|
||
|
2. Security Review: Conduct basic security review for new deployments.
|
||
|
3. User Access: Validate user access permissions for critical functionalities.
|
||
| General Post-Deployment Tasks: | ||
|
1. User Communication: Notify users or stakeholders about deployment and changes.
|
||
2. Documentation Updates: Update system
3. documentation and release notes.
|
||
4. Performance Monitoring: Set up basic performance monitoring and observe initial usage. |
||
5. Issue Tracking: Monitor for any critical issues and address them promptly. |
||
| Field: | ||
|
1. Ensure Set Field-Level Security
2. Ensure the Field is added to the Page Layout
3 .Ensure the Field is added Lightning Record Page
|
||
| Page Layout: | ||
1. Ensure if page layout assigned any record type. 2. Ensure if page layout is assigned any profile.
|
||
| Lightning Record Page: | ||
1. Ensure that there is a dynamic form, then check the Lightning Record Page works as expected. |
|
|
| Custom Settings | ||
1. Formula Fields: If you have formula fields referencing custom settings: A. Test that calculations are correct, reflecting any modified custom settings values.
B. Ensure there are no errors in the formulas due to changed field names or data types within the settings.
|
||
2. Apex Code: For code that depends on custom settings: A. Run unit tests to confirm code logic behaves properly with the new settings.
|
|
|
| 3. Validation Rules: If you use custom settings in validation rules:
|
||
| 4. Data Caching considerations | ||
| Custom Metadata (Custom Metadata Records) : | ||
| 1. Verify that any new or updated custom metadata records contain the correct values.
A. Apex Code: If you have Apex code referencing custom metadata types:
B. Conduct rigorous unit testing of any code dependent on custom metadata.
C. Pay particular attention to the code that queries or processes these records. |
||
| 2. Relationships: If you’ve established relationships between custom metadata types:
A. Verify that relationships properly link records.
B. Write test scenarios to confirm that code interacting with related custom metadata types behaves accordingly.
|
||