
1. Purpose
This document describes the end-to-end daily workflow for a Dispatcher and Service Engineer, starting from the creation and dispatch of a Job through technician assignment, travel, on-site activities, pre-job and post-job checklists, photo documentation, service report generation, invoice generation, and final Job completion.
The process is designed to provide clear visibility of the Job throughout its lifecycle and ensure that all required operational information is captured before the Job is completed.
2. End-to-End Process Overview
The overall Job lifecycle is:
Job Created → Job in Queue → Dispatcher Reviews Job → Job Dispatched → Engineer Receives Job → Clock In → In Route → On Site → Pre-Job Debrief → Work Execution → Post-Job Debrief → Additional Photos → Complete Job → Service Report → Invoice Generated → Job Completed
The process involves two primary users:
Dispatcher
Responsible for:
- Reviewing Jobs
- Managing the dispatch queue
- Assigning Jobs to Service Engineers
- Monitoring engineer availability and occupancy
- Coordinating Job assignments
Service Engineer
Responsible for:
- Receiving assigned Jobs
- Clocking in and out
- Updating Job status
- Travelling to the customer site
- Completing pre-job requirements
- Performing the assigned work
- Completing post-job requirements
- Uploading required photographs
- Reviewing/completing the Service Report
- Completing the Job
3. Dispatcher Daily Workflow
3.1 Accessing the Job List
At the beginning of the workflow, the Dispatcher can access the list of Jobs.
The Dispatcher can review Jobs from:
- Job List
- Dispatch Board
The Job List provides a direct view of the Jobs currently available in the system, while the Dispatch Board provides a visual representation of Jobs and Service Engineer availability.
Typical Job State
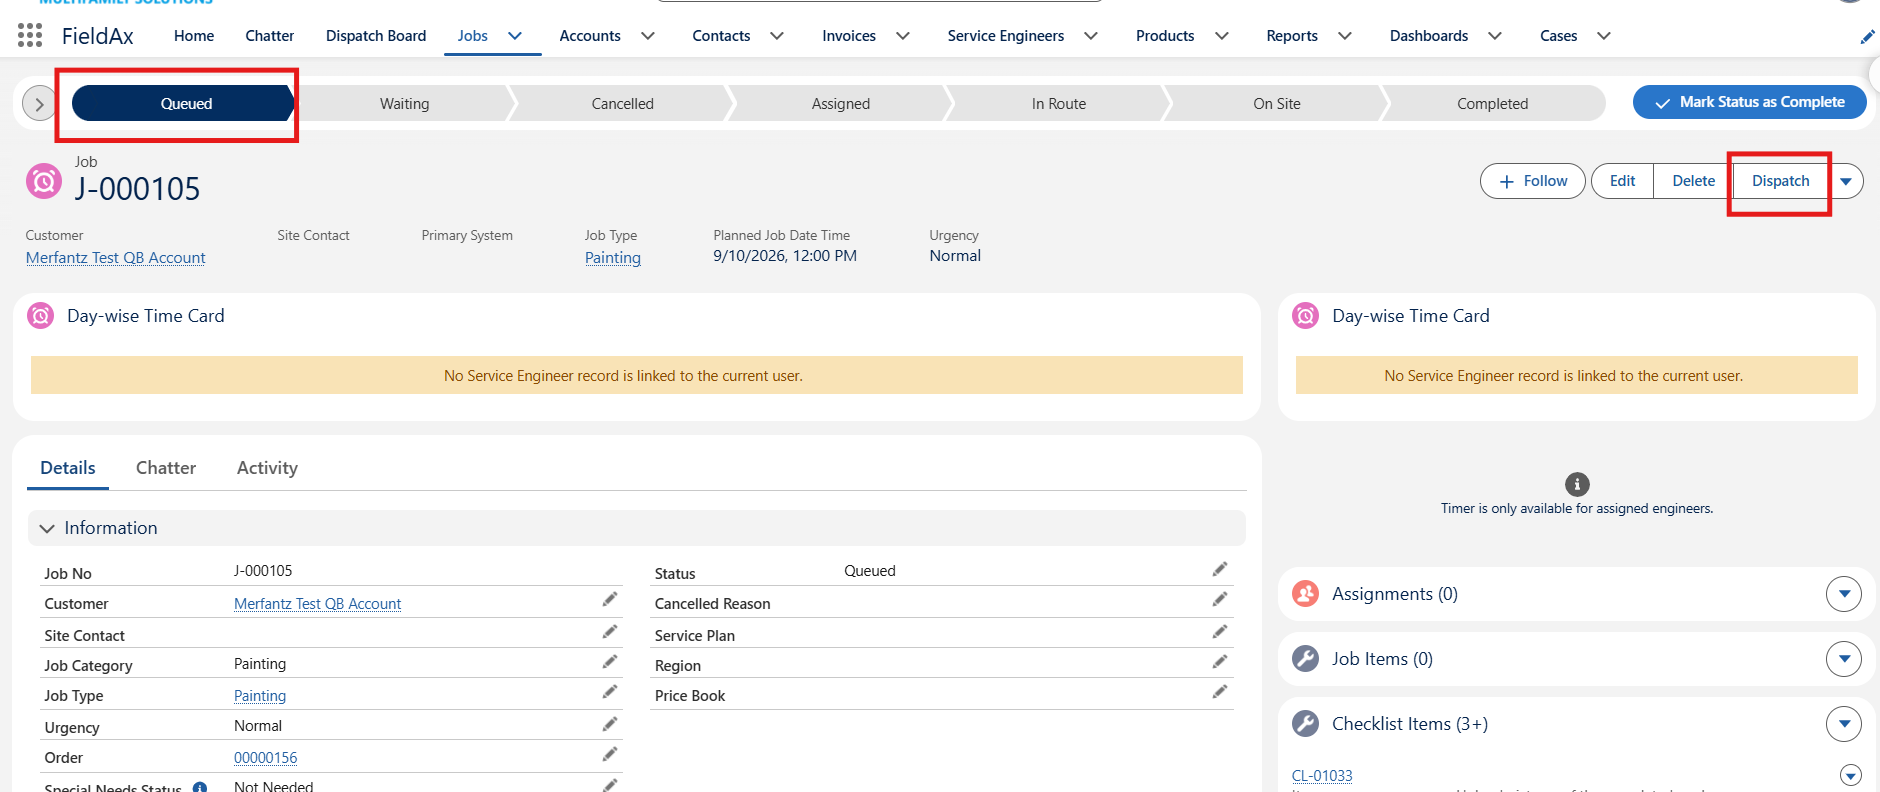
A newly created Job will normally appear in the Queue until it is assigned to a Service Engineer.
4. Opening and Reviewing a Job
The Dispatcher can open a Job from the Job List and review the Job details.
From the Job, the Dispatcher can select the Dispatch option.
The Dispatcher therefore has two ways to initiate dispatch:
Option 1 – Dispatch from the Job
Job → Dispatch
Selecting the Dispatch button opens the dispatch interface.
Option 2 – Dispatch from the Dispatch Board
The Dispatcher can directly access the Dispatch Board and locate the Job in the queue.
Both approaches ultimately take the Dispatcher to the dispatch interface used for assigning the Job.
5. Dispatch Board
The Dispatch Board provides the Dispatcher with a visual view of:
- Jobs waiting for assignment
- Service Engineers
- Engineer availability
- Daily occupancy/schedule
- Existing assignments
- Available time slots
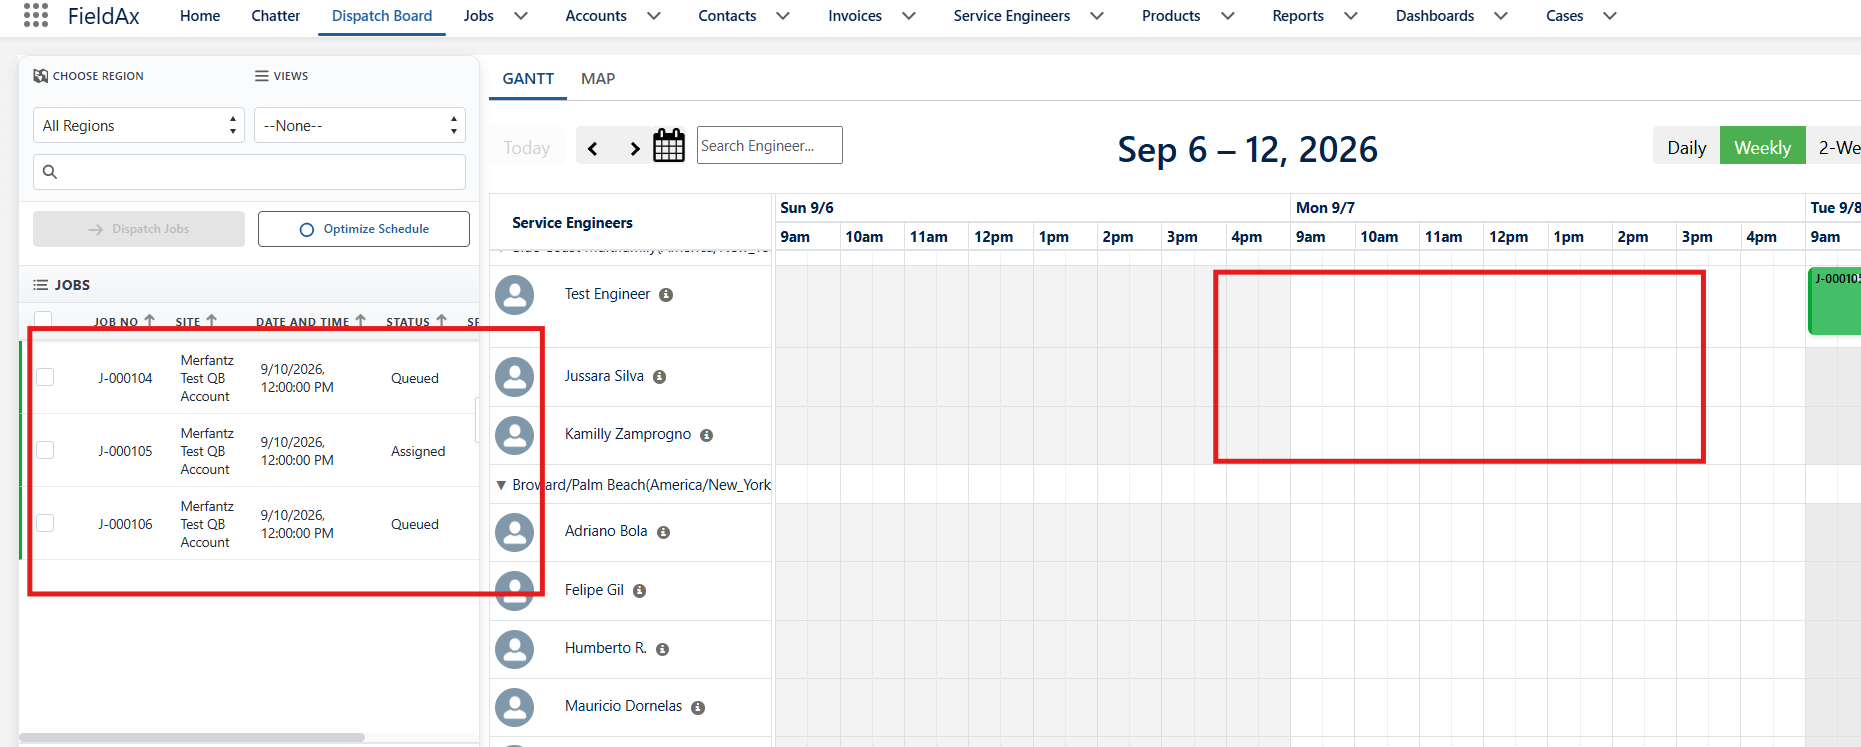
The Dispatcher can use this information to determine the appropriate engineer and time slot for the Job.
5.1 Assigning a Job
There are two primary methods of assigning the Job.
Method 1 – Drag and Drop
The Dispatcher can:
- Select the Job from the queue.
- Drag the Job onto the required Service Engineer.
- Drop the Job into an available time slot.
- The Job is assigned to that engineer.
Method 2 – Select an Available Time Slot
The Dispatcher can also identify a Service Engineer with available space in their daily occupancy.
The Dispatcher can select the available space/time slot associated with the engineer and assign the Job there.
This provides flexibility for Dispatchers to quickly assign Jobs based on engineer availability and existing schedules.
6. Dispatcher Responsibility Ends After Assignment
Once the Job has been successfully assigned:
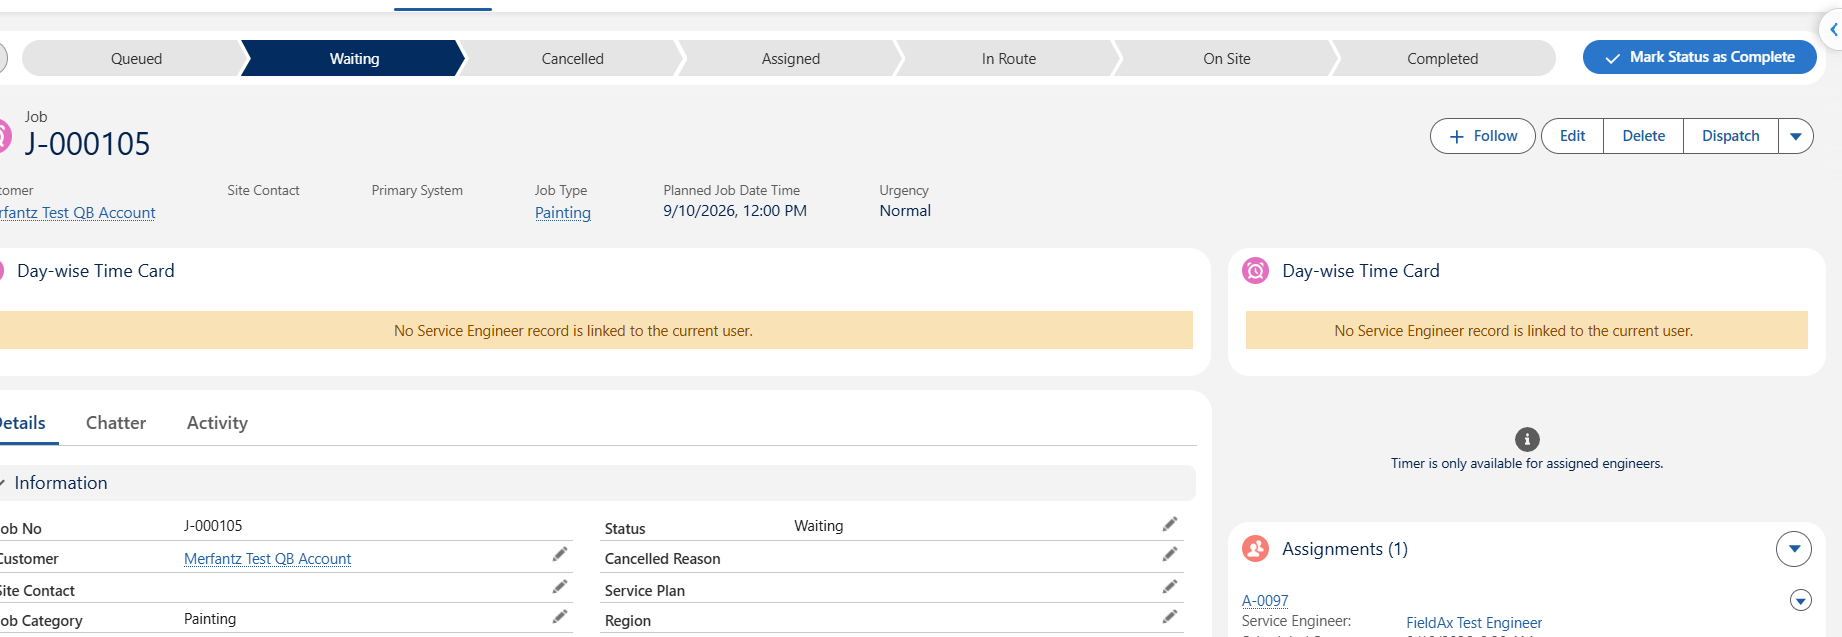
Job Status → Assigned
The assigned Job becomes visible on the Service Engineer’s mobile application.
At this point, the Dispatcher has completed the primary dispatch activity.
The Service Engineer can now continue with the Job from the mobile device.
7. Service Engineer Mobile Workflow
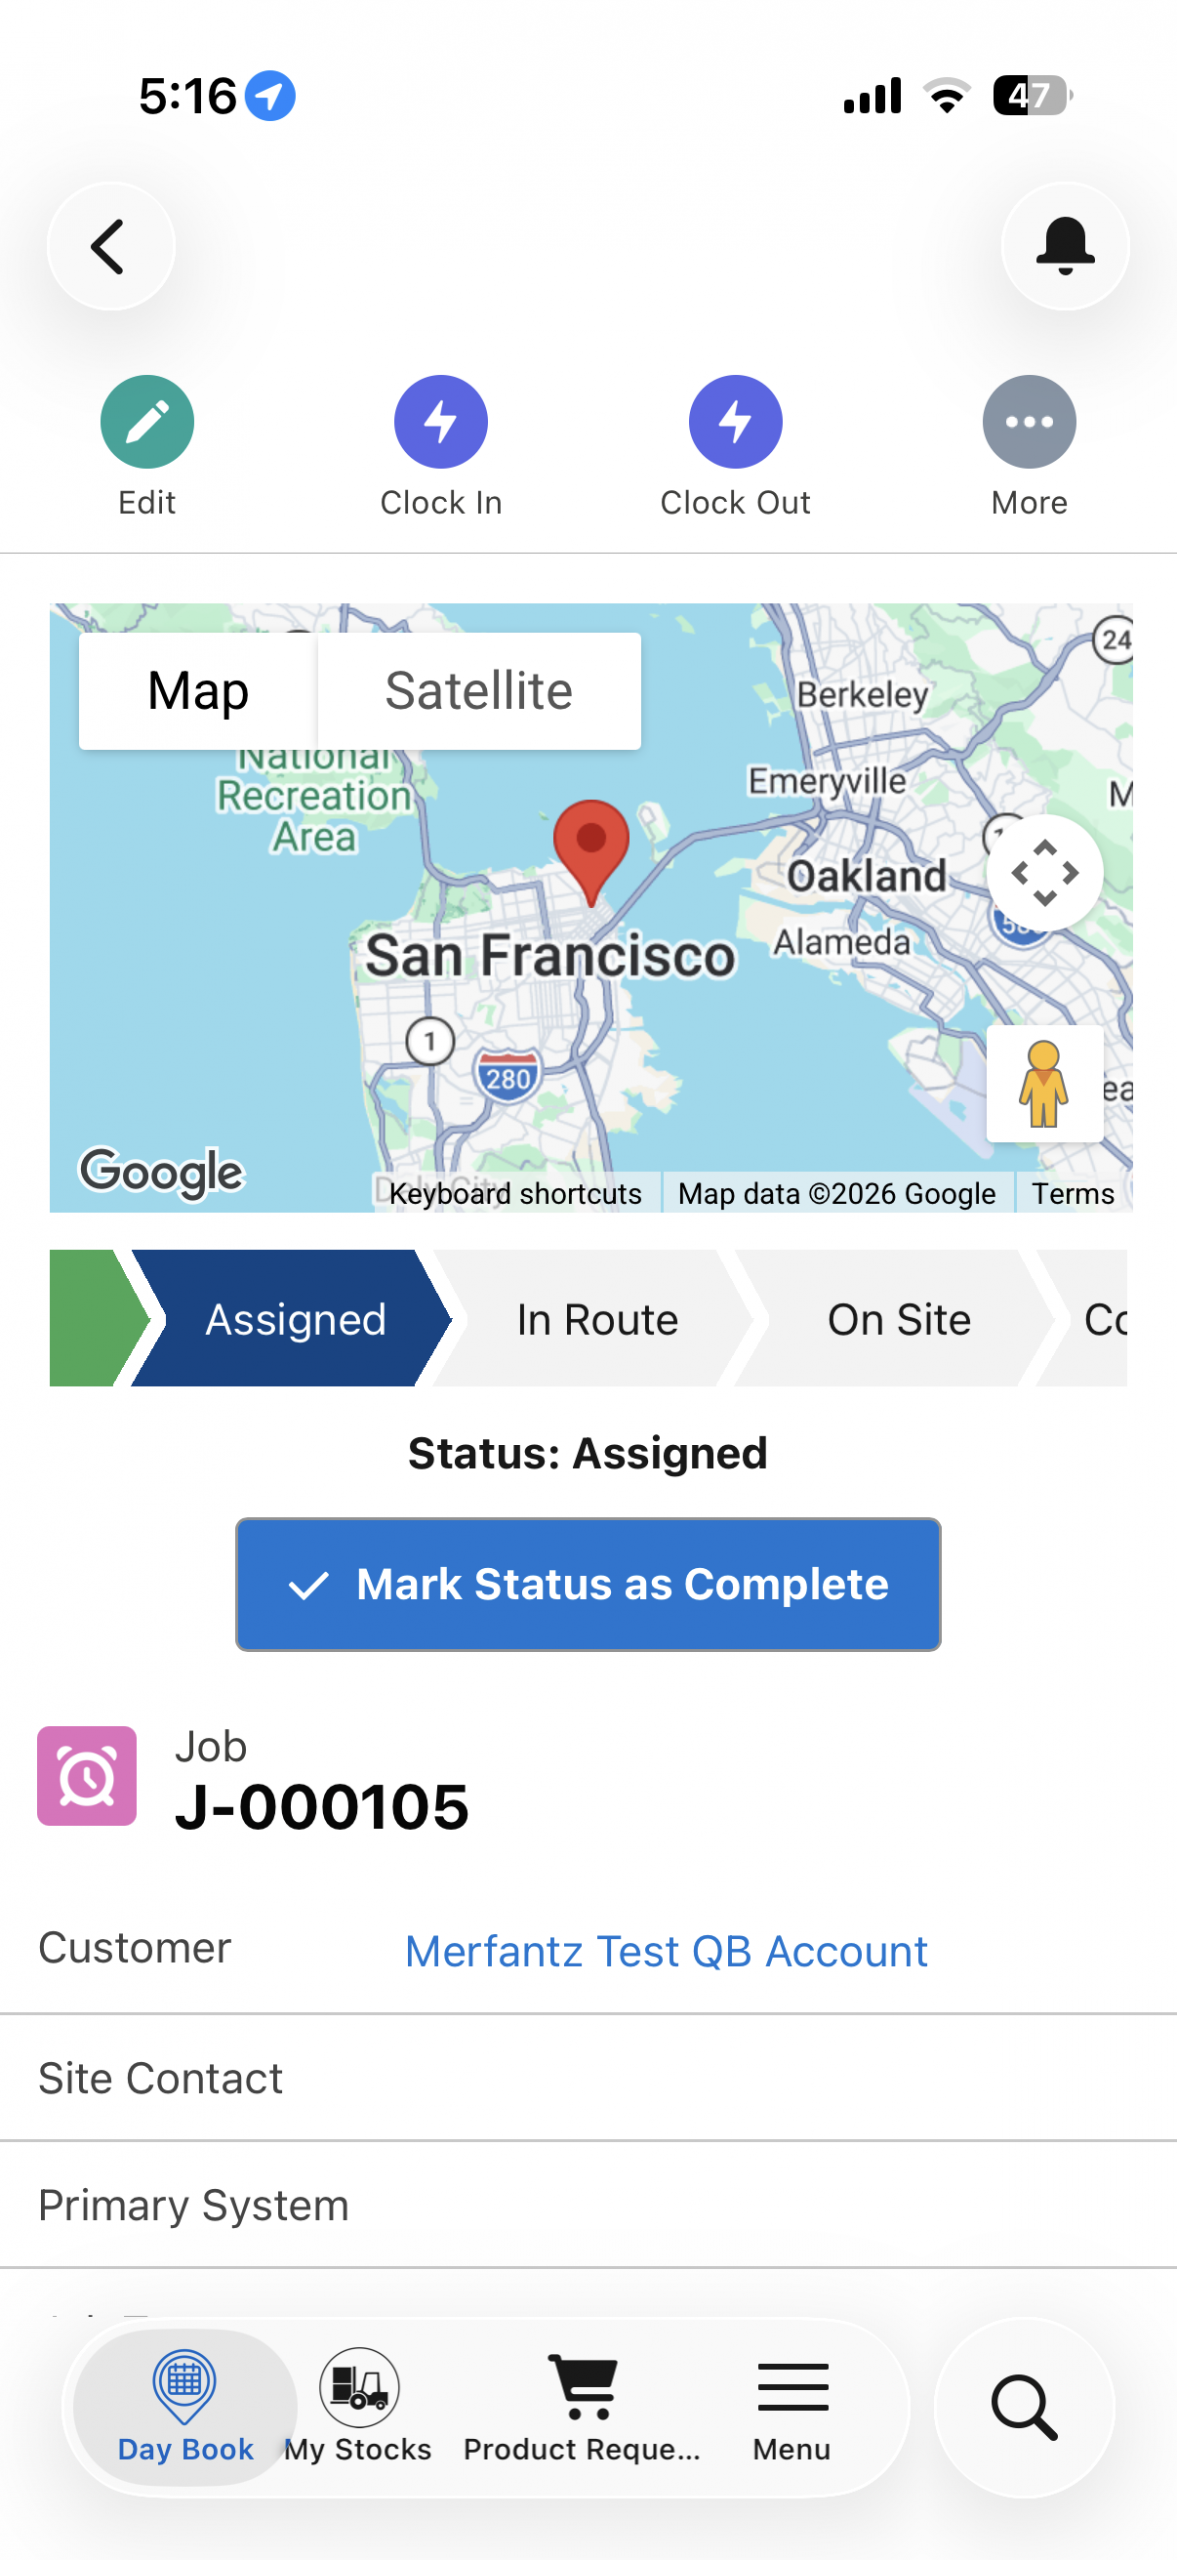
Once the Dispatcher assigns the Job, the Service Engineer receives the Job on their mobile application.
The Job will appear in an Assigned state.
The Service Engineer then manages the Job through the different stages of execution.
The typical status progression is:
Assigned → In Route → On Site → Completed
Additional activities, checklists, and debriefs are performed during these stages.
8. Daily Clock-In and Clock-Out
Before starting the day’s work, the Service Engineer performs a Clock In activity.
The engineer’s daily working time is captured through the clock-in and clock-out process.
Clock In
The engineer clocks in at the beginning of their working day.
The clock-in establishes the start of the engineer’s working time.
The engineer can then proceed with their assigned Jobs.
Clock Out
At the end of the working day, the engineer performs a Clock Out.
The engineer’s daily working duration can therefore be captured based on:
Clock In → Work Activities → Clock Out
The engineer does not need to clock in and out separately for every Job. The daily time is captured through the beginning and end of the working day.
9. Starting Travel – In Route
Once the Service Engineer is ready to travel to the customer location, the engineer updates the Job status to:
In Route
This indicates that:
- The Job has been accepted/assigned.
- The engineer has started travelling.
- The engineer is on the way to the customer site.
The Dispatcher can use the Job status to understand that the engineer has started travelling to the assigned Job.
10. Arriving at Customer Site – On Site
Once the engineer reaches the customer location, the engineer updates the Job status to:
On Site
This indicates that the engineer has arrived at the site and is ready to begin the required activities.
At this stage, the engineer can proceed with the pre-job requirements.
11. Debrief
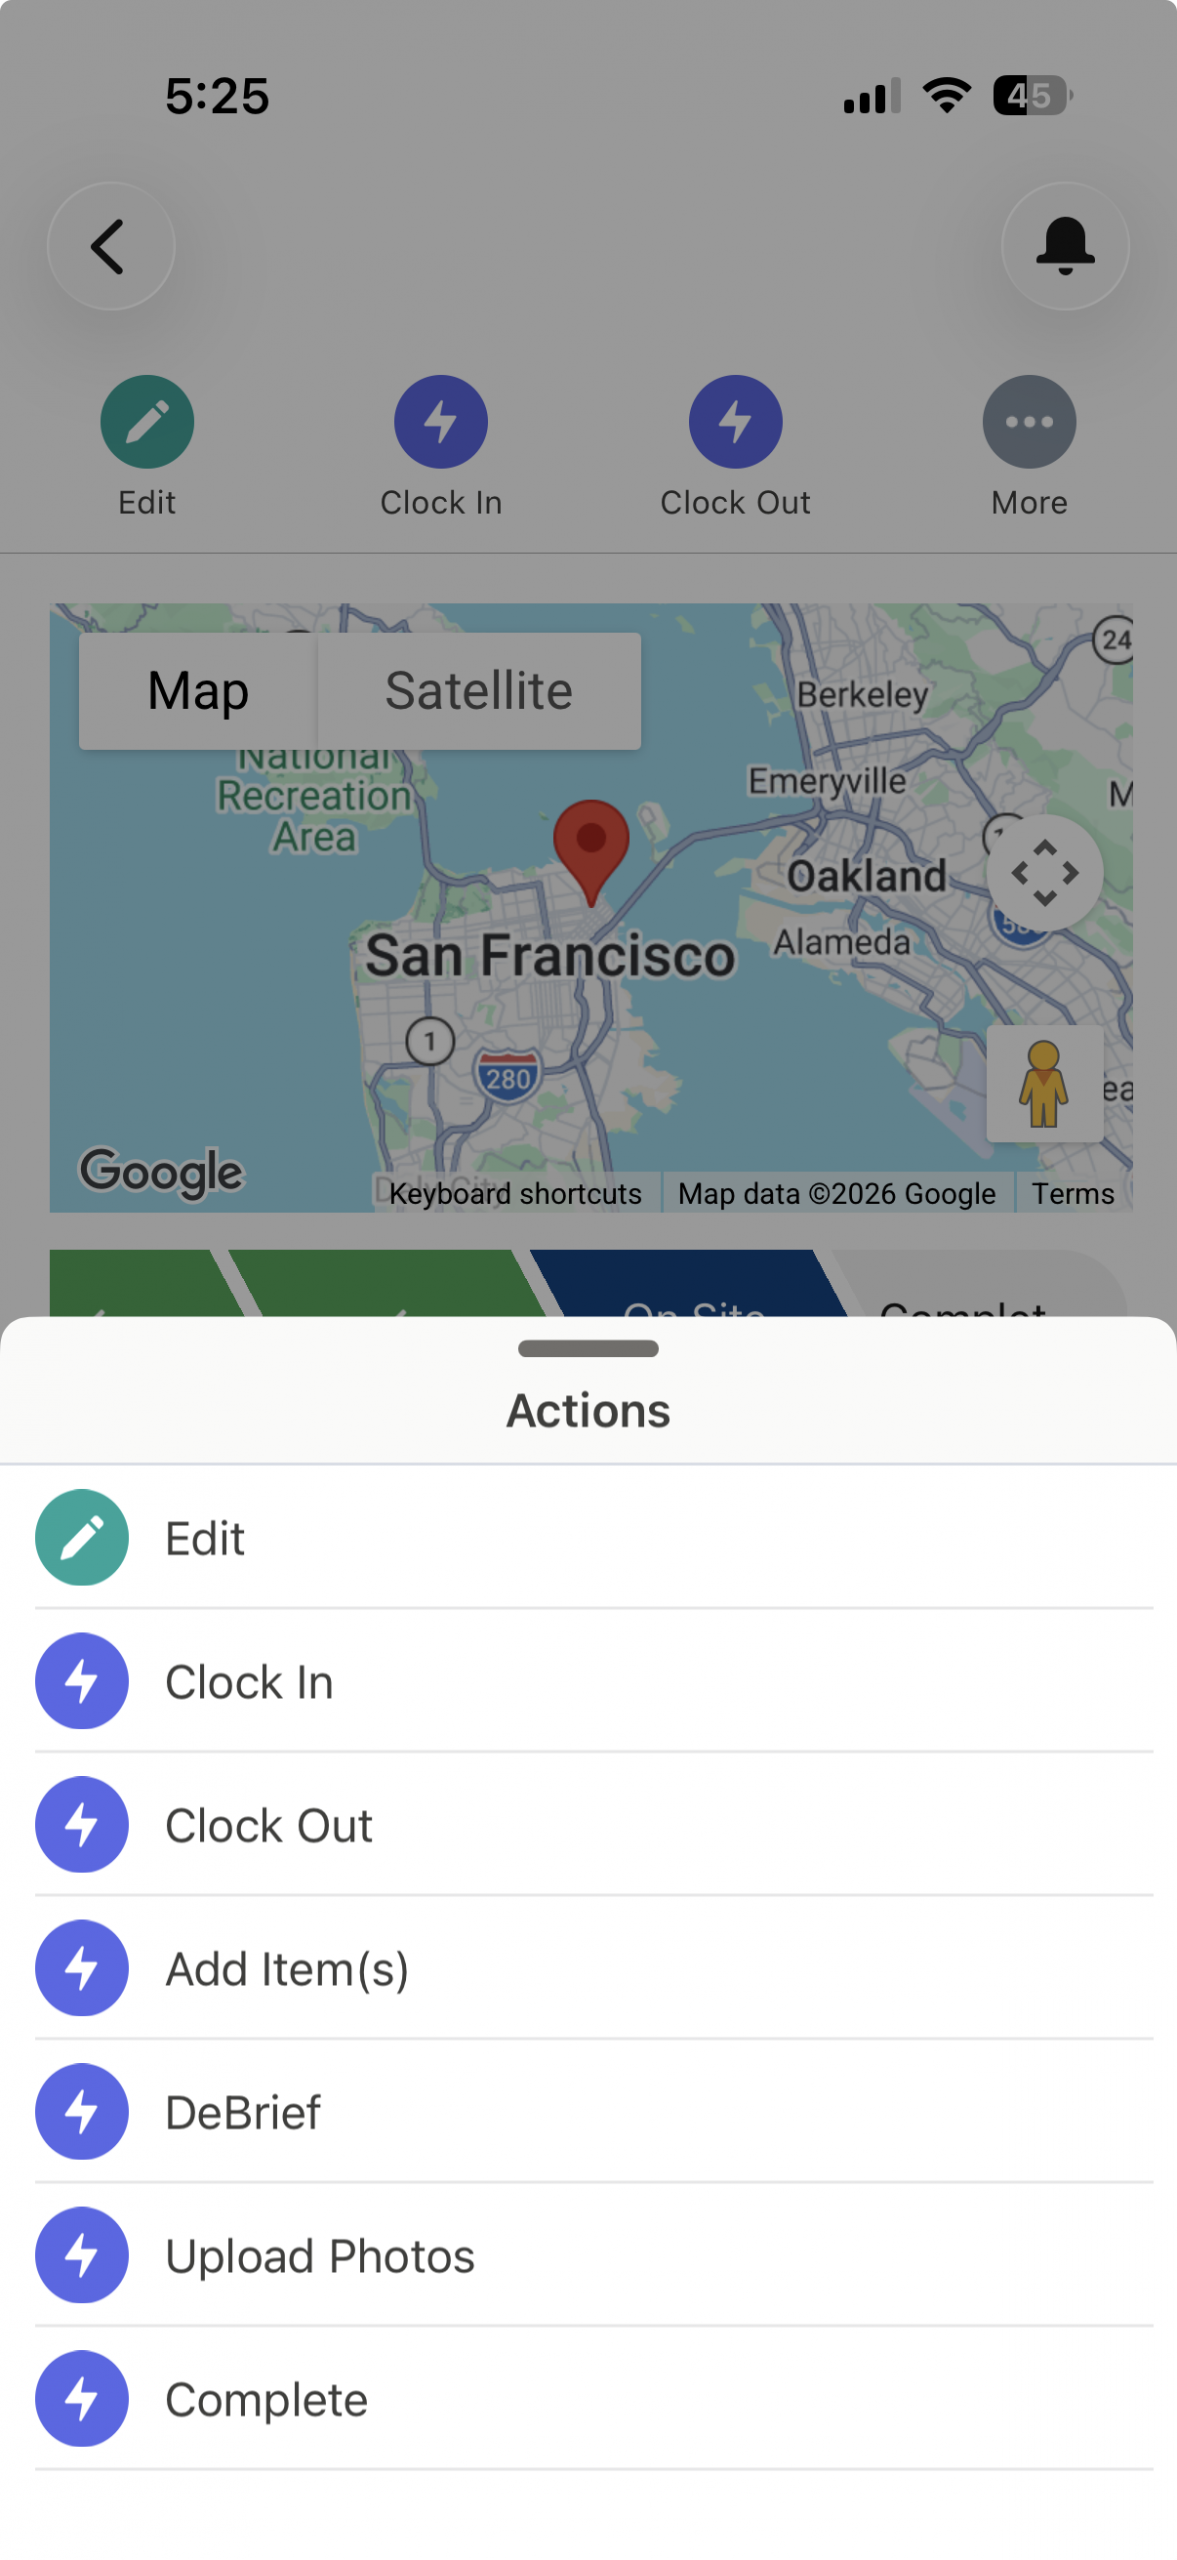
The Service Engineer accesses the More / Three-Dot Menu at the top of the Job.
From the menu, the engineer selects:
More → Debrief → Pre-Job
The Debrief is used to capture the required information before work begins.
12. Pre-Job Checklist
The engineer completes the Pre-Job Checklist after arriving at the customer site.
The checklist is intended to confirm that the required site and pre-work conditions have been reviewed before the actual work starts.
Mandatory Questions
All questions included in the Pre-Job Checklist are required.
The engineer must complete every required question before the checklist can be submitted.
Required Photo Uploads
The Pre-Job Checklist also contains required photo upload fields.
Each designated upload field requires:
One photo per upload field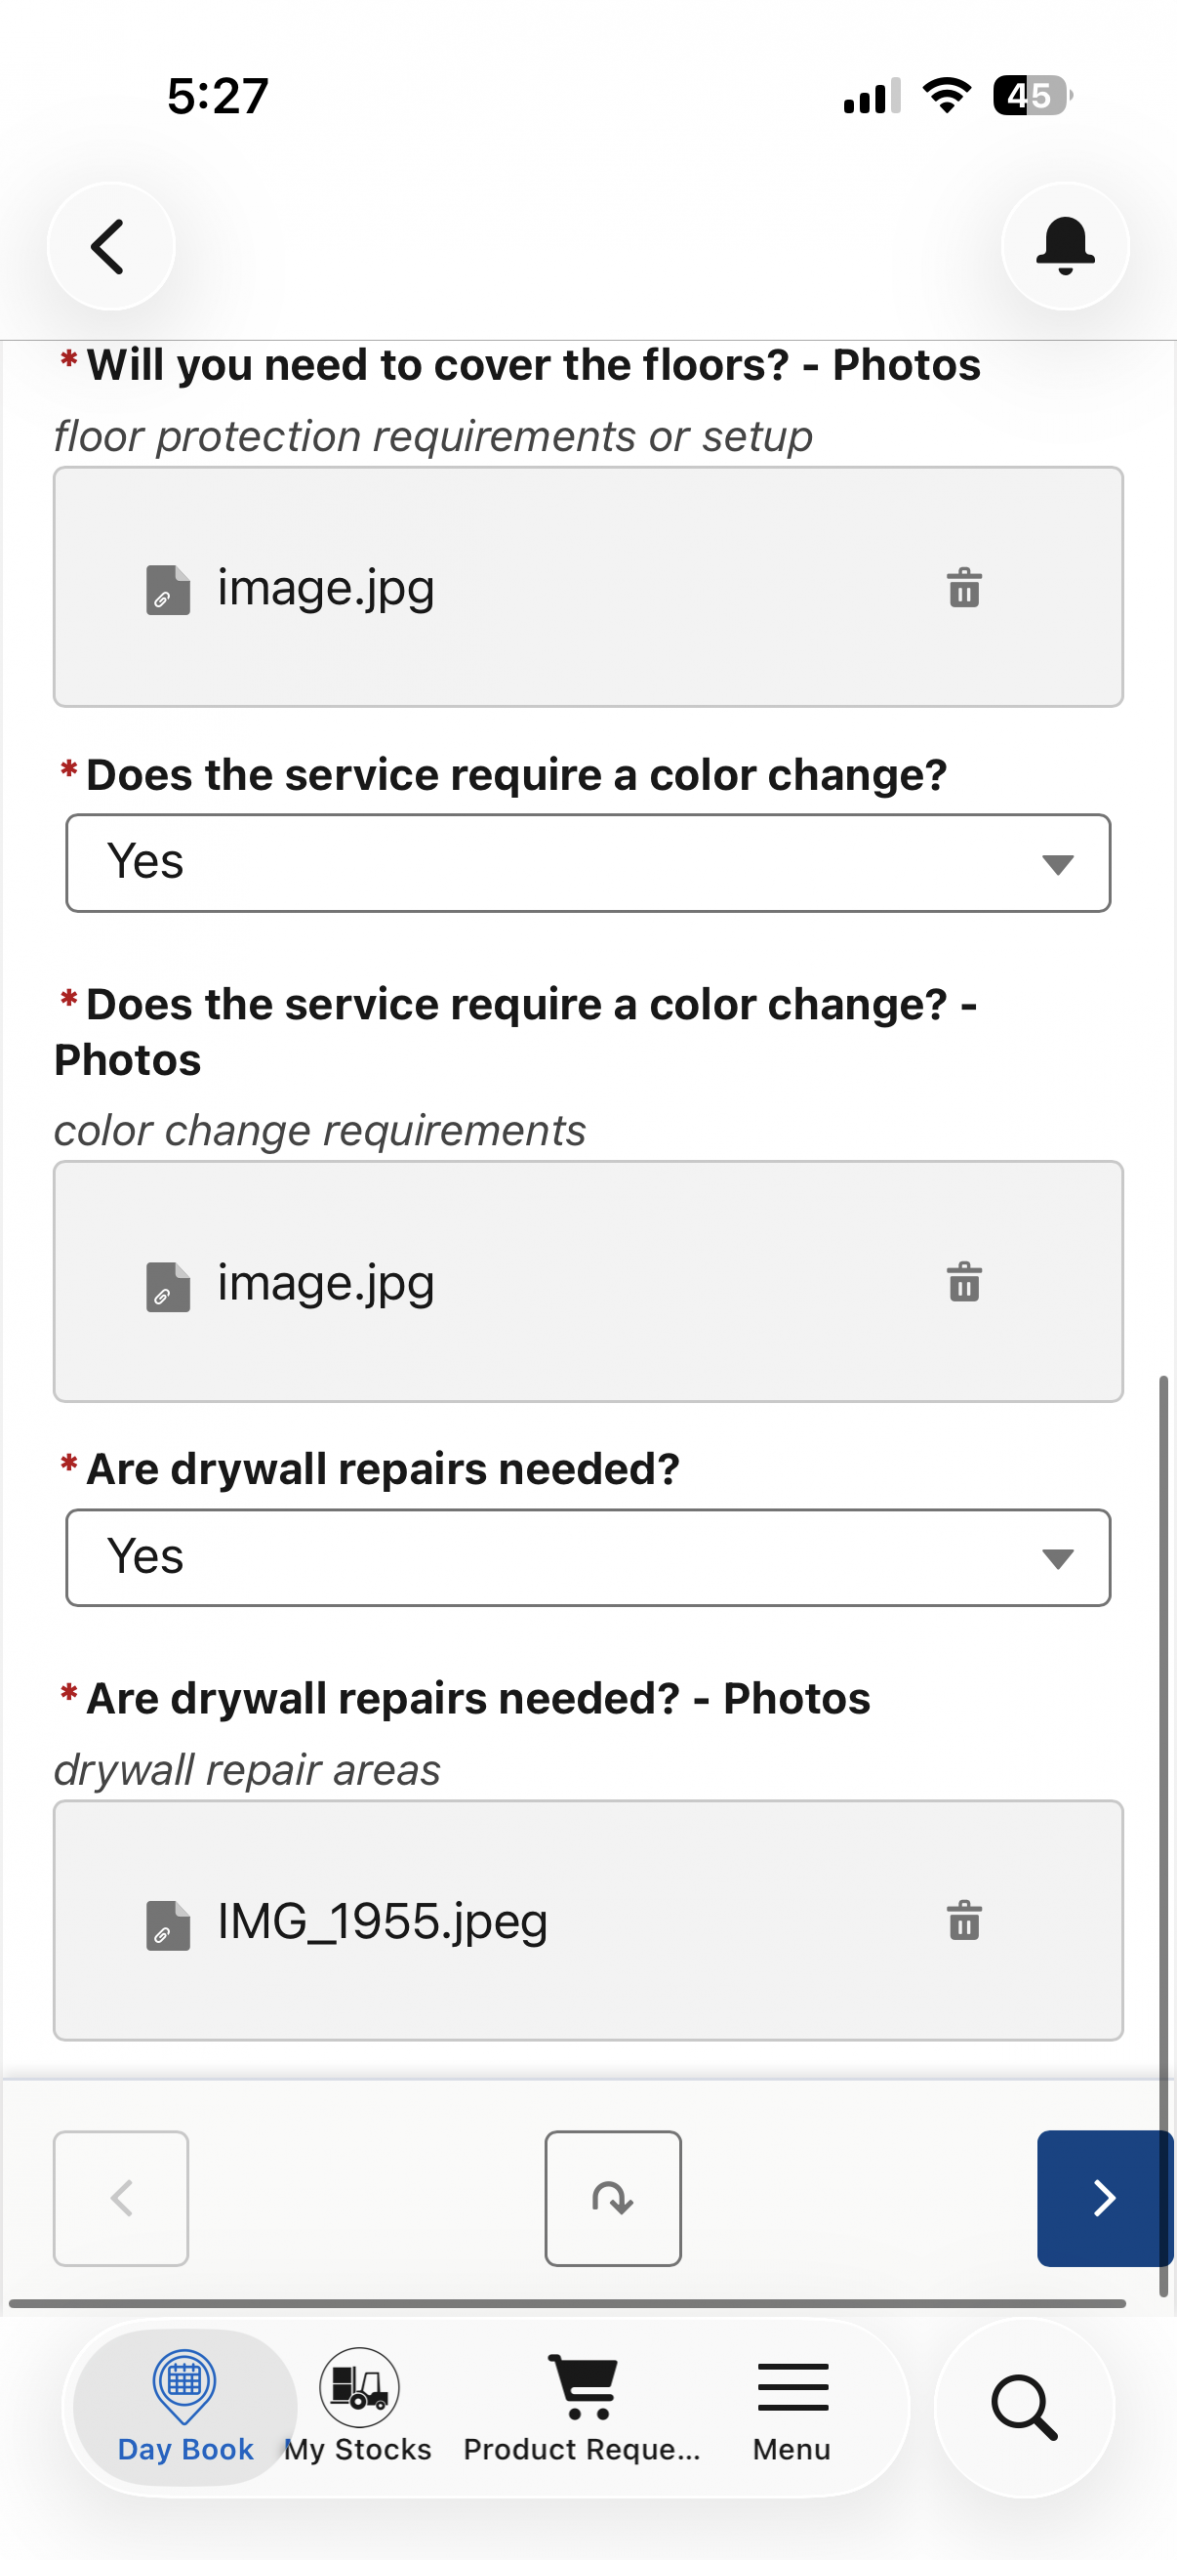
For example:
| Checklist Item | Requirement |
|---|---|
| Pre-Job Question 1 | Required |
| Pre-Job Question 2 | Required |
| Site Photo 1 | One photo required |
| Site Photo 2 | One photo required |
| Equipment Photo | One photo required |
The engineer must complete all required questions and required photo fields.
13. Submitting the Pre-Job Checklist
Once all required questions and photo uploads have been completed, the engineer can submit the checklist using the down-arrow/submit action available on the screen.
The submitted information is saved against the Job.
After submission, the engineer can use the Back arrow at the top of the screen to return to the Job.
The engineer can then proceed with the remaining Job activities.
14. Work Execution
After the Pre-Job Checklist has been completed, the engineer proceeds with the actual work at the customer site.
Depending on the Job and operational process, the engineer may also coordinate with the Dispatch Team before beginning the work.
For example, the engineer may obtain confirmation from the Dispatch Team that they can proceed with the required work.
Once confirmation is received, the engineer performs the assigned service activities.
15. Debrief
After the work has been completed at the customer site, the engineer returns to the More / Three-Dot Menu.
The engineer selects:
More → Debrief → Post-Job
The Debrief is used to capture the final information after the service work has been performed.
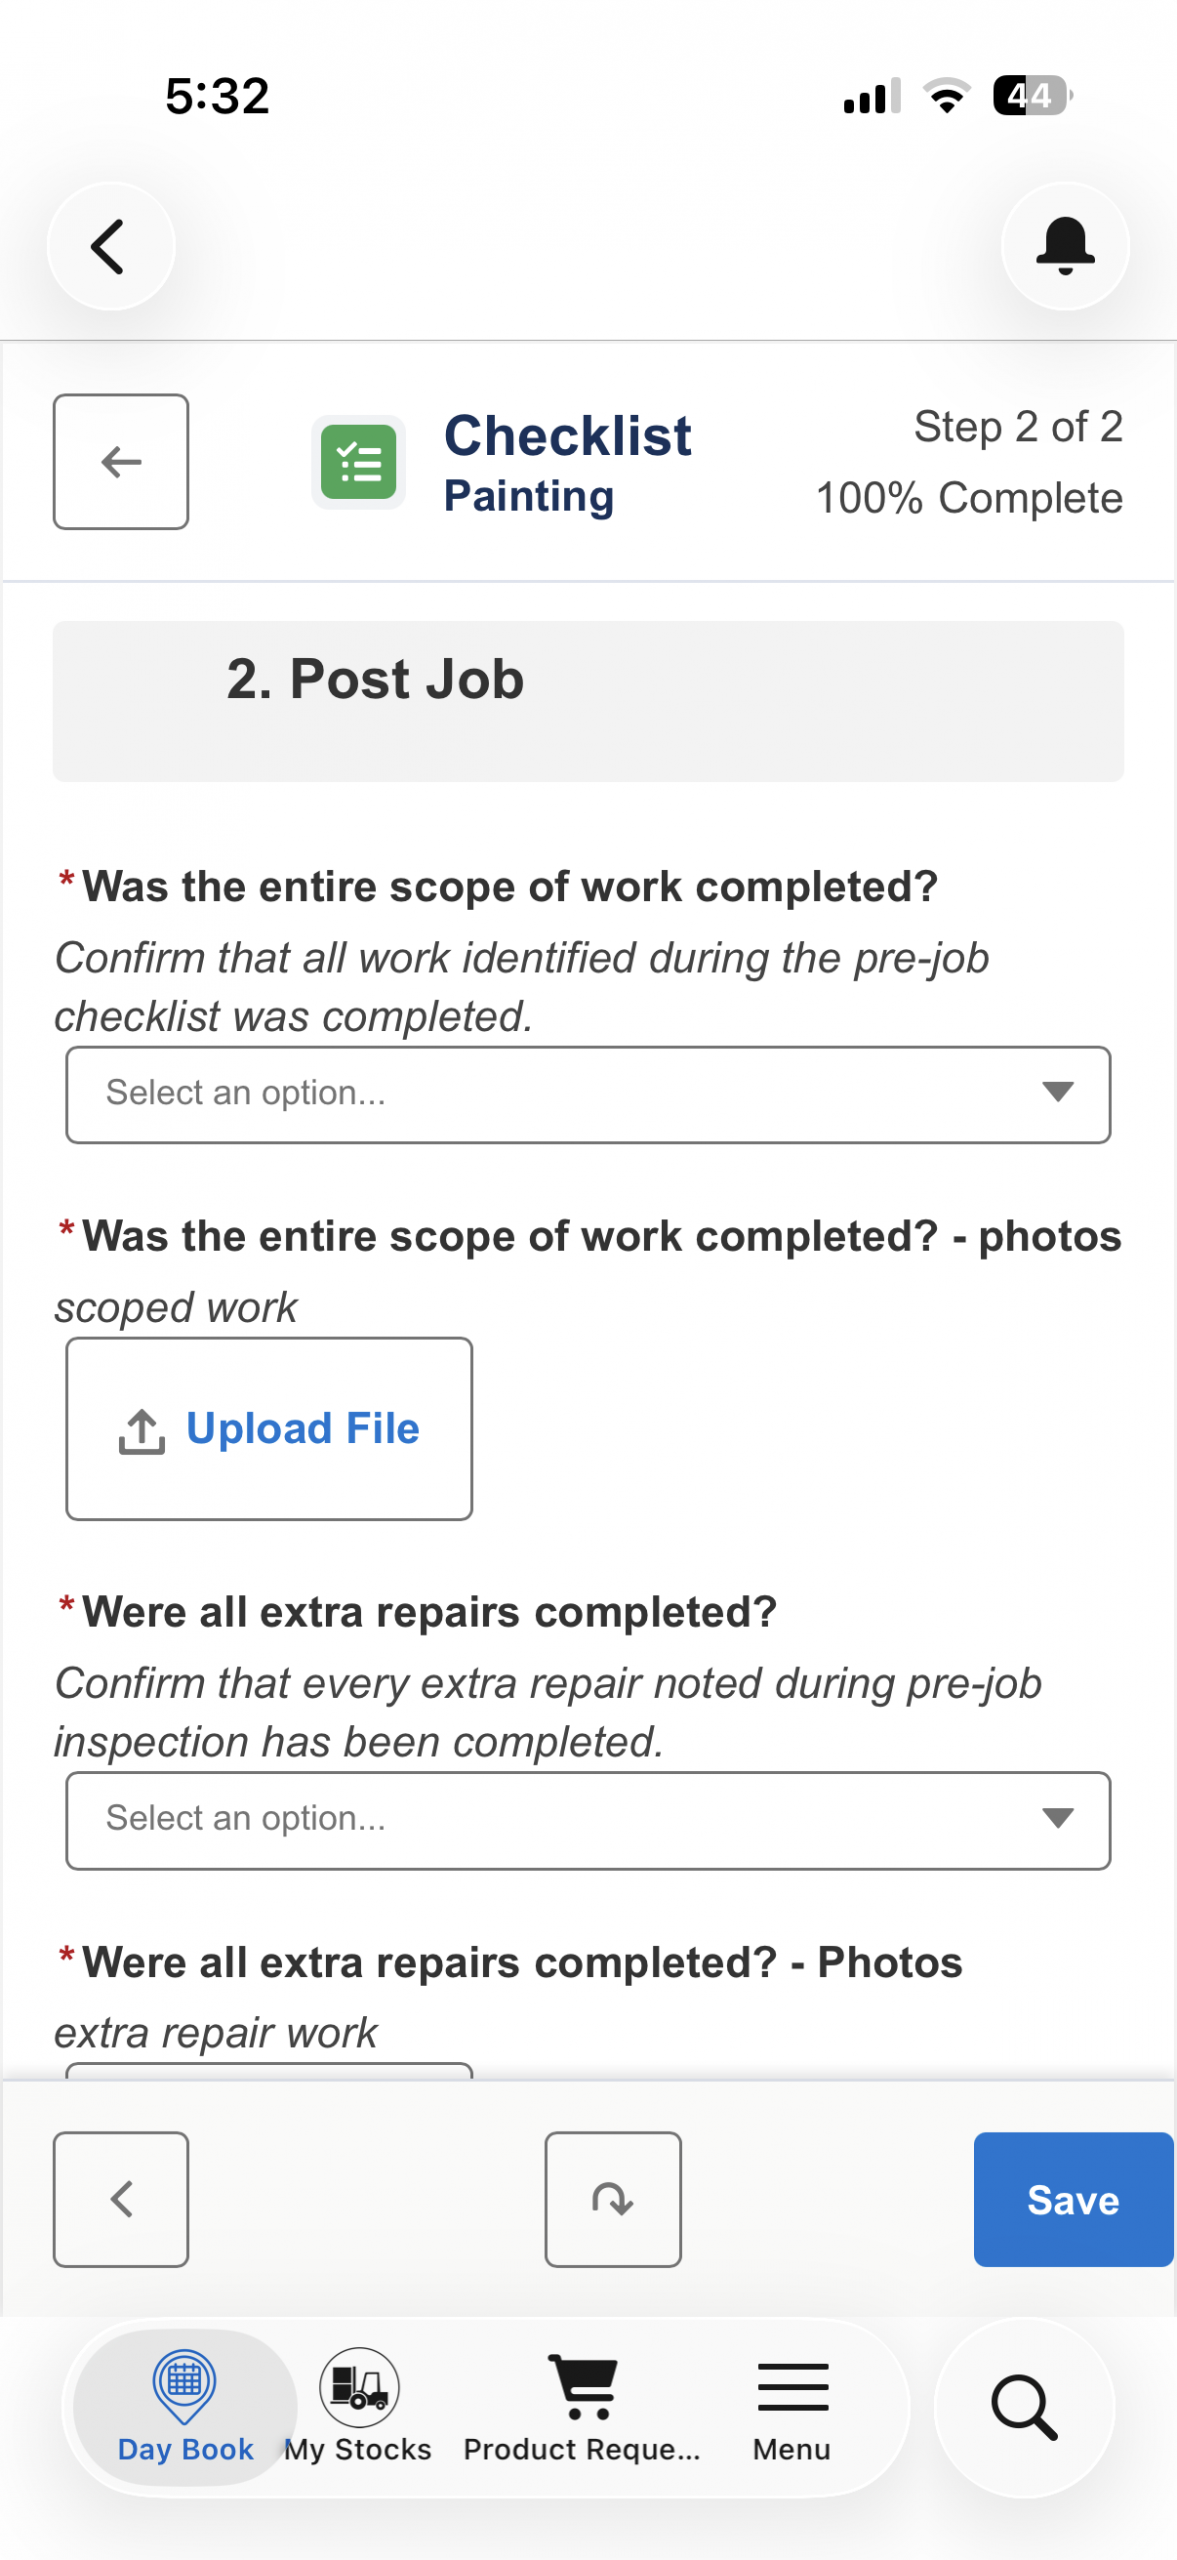
16. Post-Job Checklist
The engineer completes the Post-Job Checklist.
The Post-Job Checklist captures the condition and outcome of the Job after the work has been completed.
Mandatory Questions
All Post-Job Checklist questions are required.
The engineer must answer every required question before submitting the checklist.
Required Photos
Where photo upload fields are provided, each upload field requires one photo.
The engineer therefore completes:
- Required Post-Job questions
- Required Post-Job photo uploads
- Any other mandatory information configured for the checklist
Once all mandatory information has been completed, the engineer submits the Post-Job Debrief.
17. Additional Photo Uploads
In addition to the individual photo upload fields within the Pre-Job and Post-Job Checklists, the engineer may need to upload additional photographs.
This can be required when:
- Multiple site photographs are needed
- Additional equipment photographs are required
- Several photos need to be documented as evidence of completed work
- The Job requires more photographs than the checklist upload fields accommodate
- Pre-recorded/reference photographs need to be attached to the Job
Uploading Multiple Photos
The engineer can use:
More / Three-Dot Menu → Upload Photos
The Upload Photos functionality allows multiple photographs to be uploaded at a time.
Up to 10 photos can be uploaded in one batch.
If more than 10 photographs are required, the engineer can upload the next batch of photographs.
For example:
Batch 1 → 10 Photos
Batch 2 → 10 Photos
Batch 3 → Remaining Photos
This allows the engineer to upload a larger number of photographs without being restricted to the individual checklist photo fields.
18. Photo Information in Service Documentation
The photographs uploaded against the Job are available for use in the downstream service documentation.
The uploaded photographs can be reflected in the:
- Service Report
- Invoice/documentation where configured
This ensures that the photographs captured by the engineer become part of the Job’s supporting documentation.
19. Completing the Job
Once all work has been completed and all required documentation has been captured, the engineer can proceed to complete the Job.
From the Job, the engineer selects:
More / Three-Dot Menu → Complete
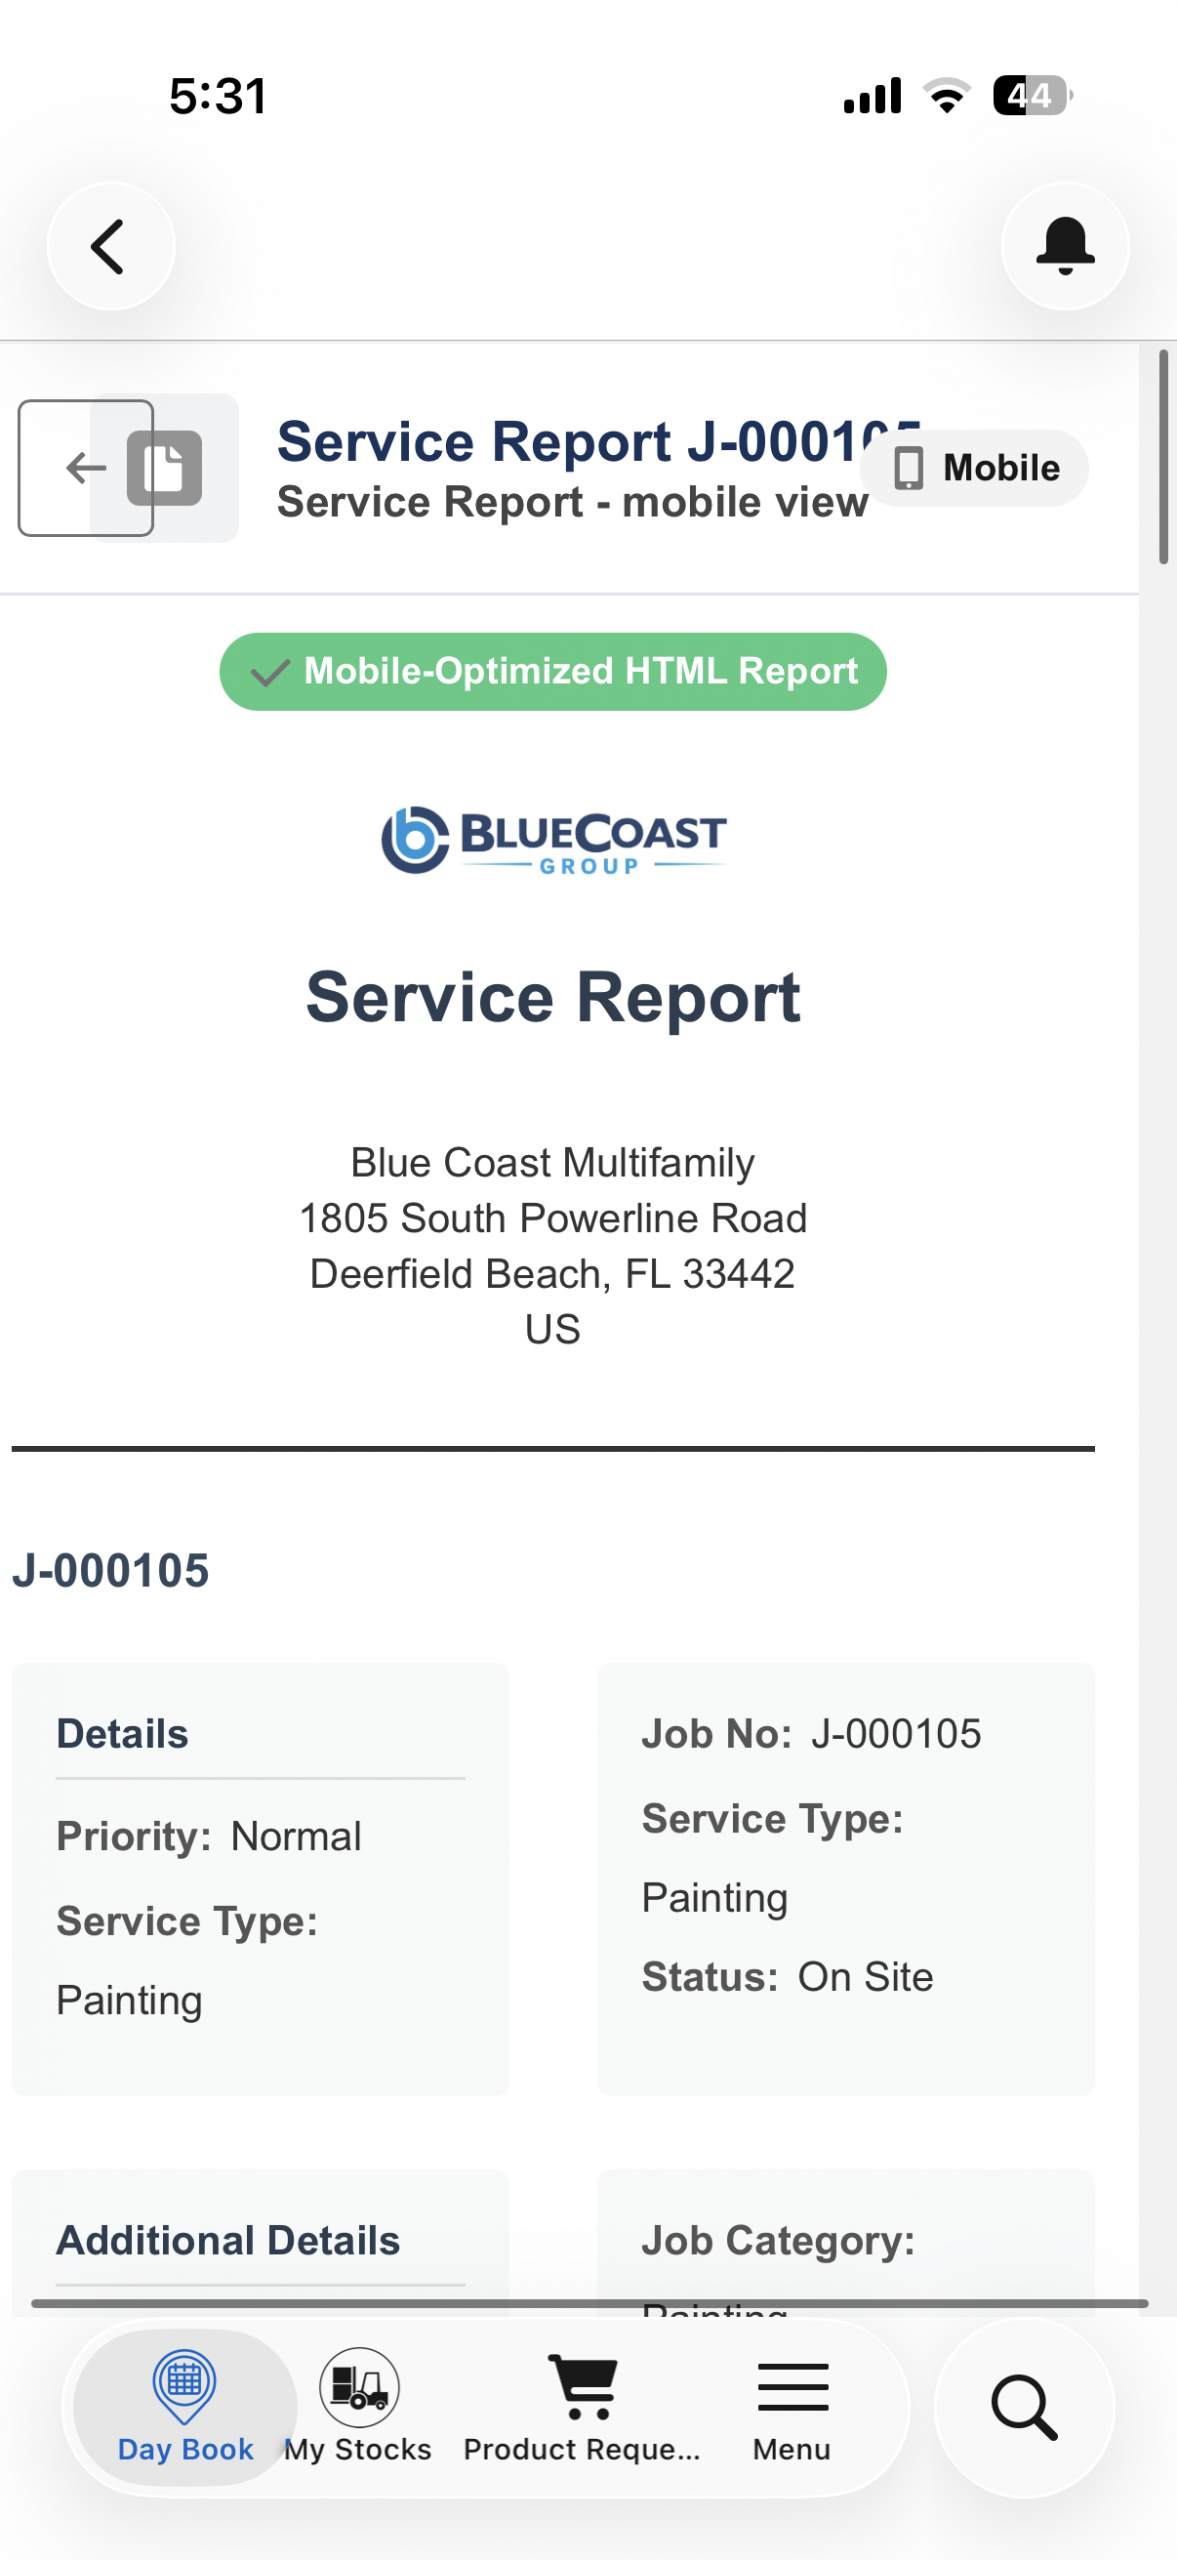
The completion process opens the Service Report.
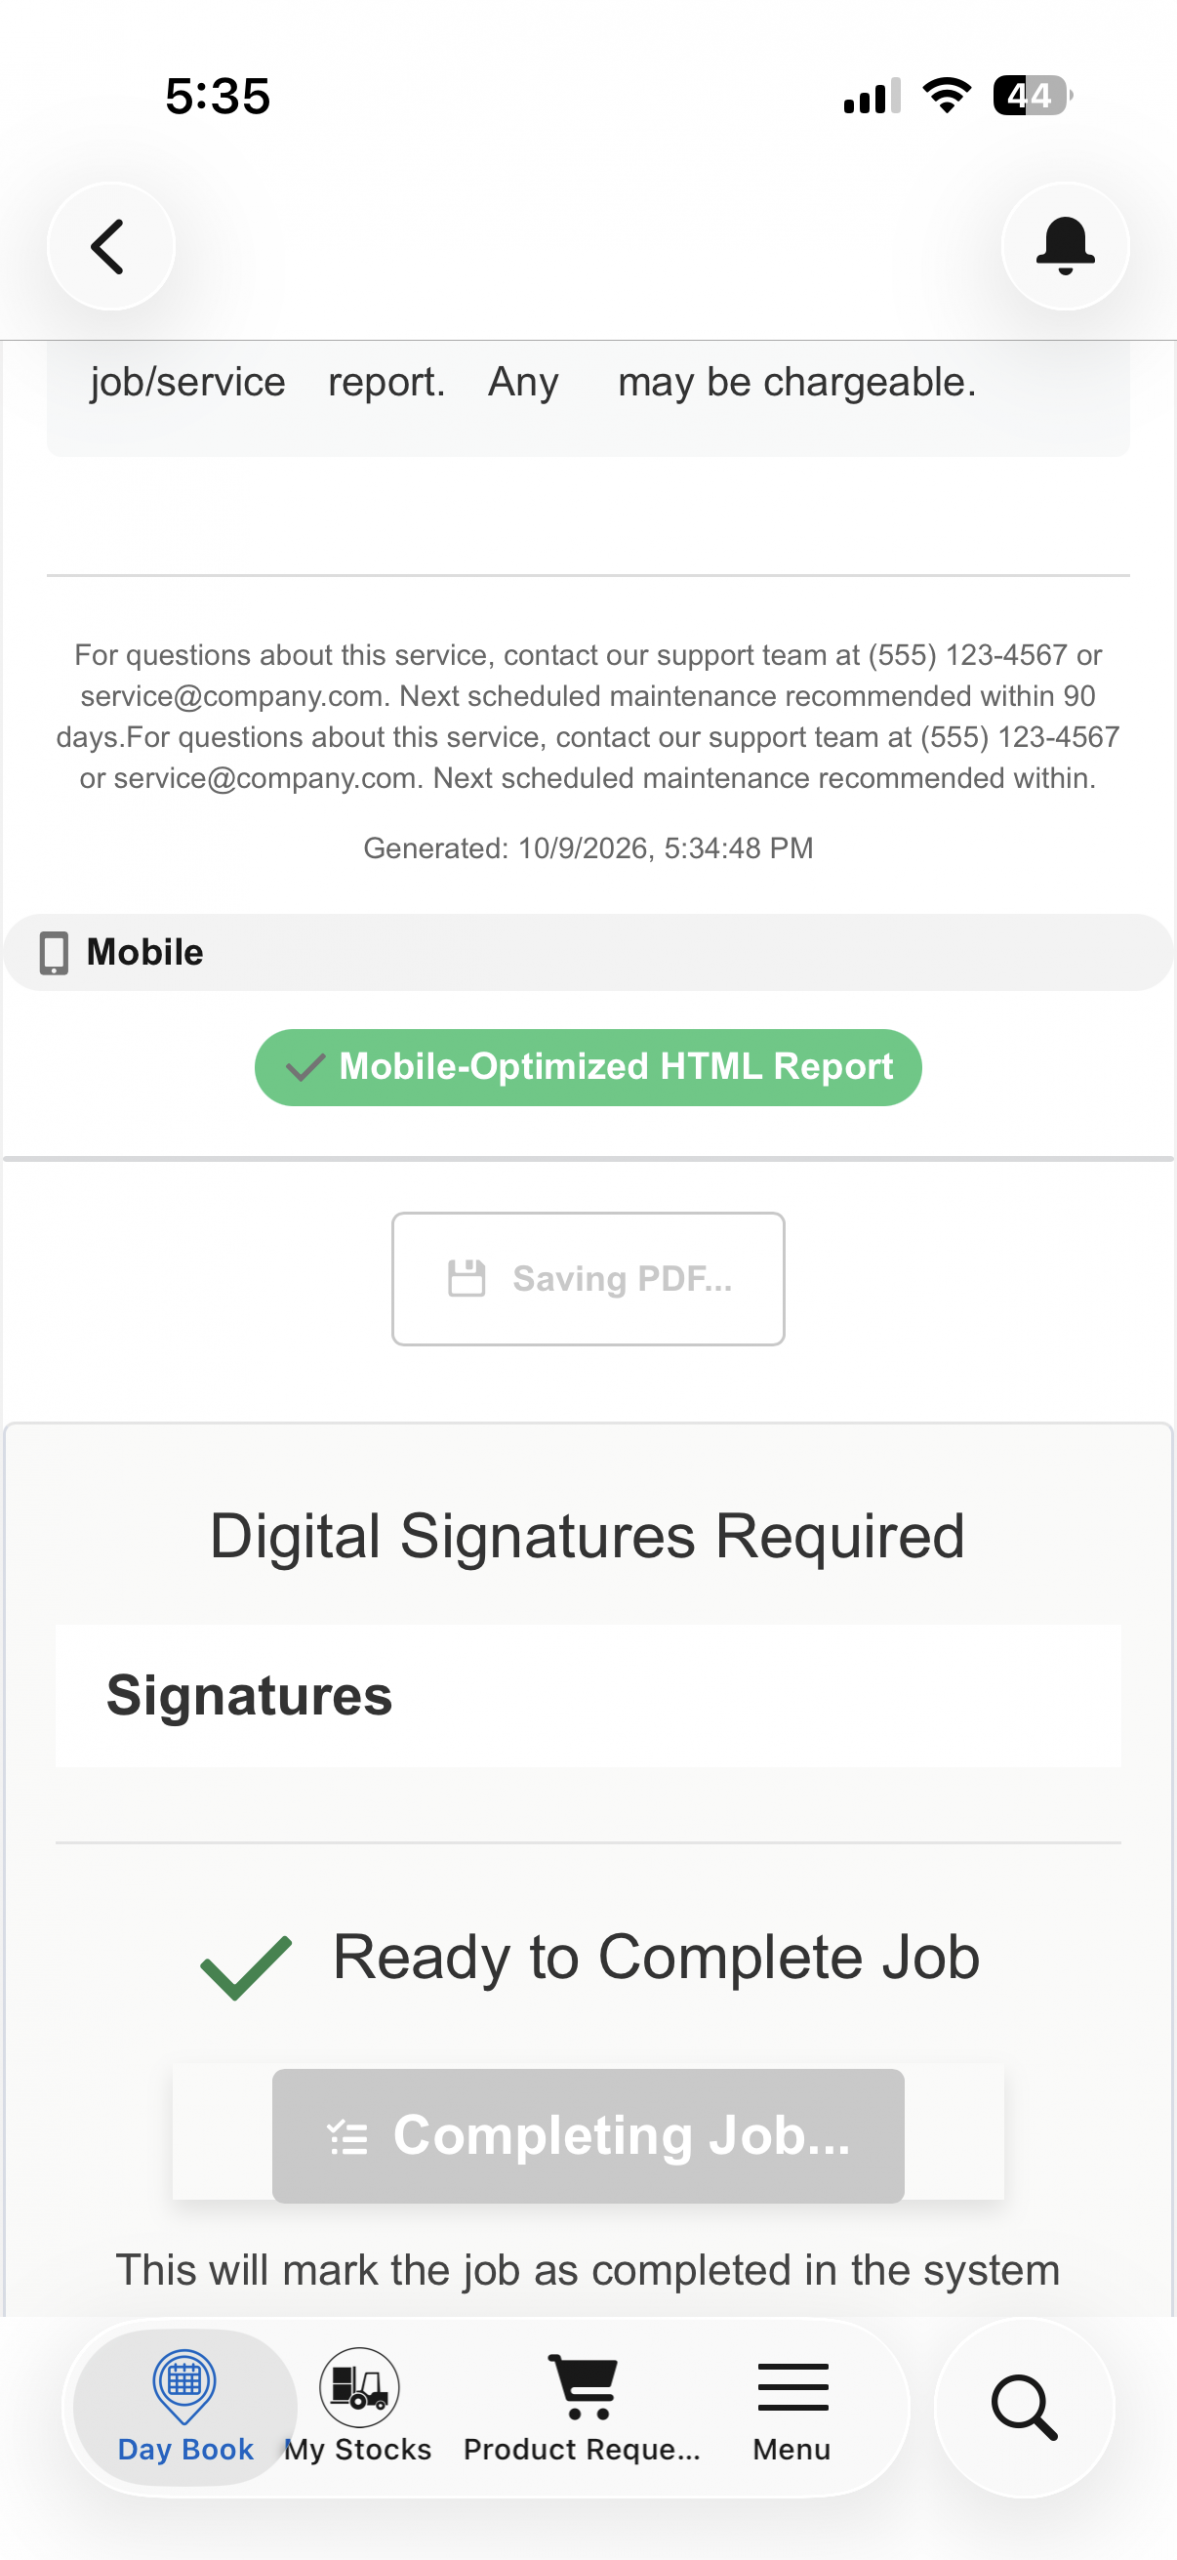
20. Service Report
The Service Report contains the information captured during the Job.
This may include information such as:
- Job details
- Service activities
- Pre-Job information
- Post-Job information
- Checklist responses
- Uploaded photographs
- Work-related information
The engineer can review the Service Report before completing the Job.
21. Customer and Engineer Signature
For this process, a customer signature and engineer signature are not required to complete the Job.
The engineer can proceed directly through the Service Report and completion process without obtaining a signature.
22. Final Job Completion
After reviewing the Service Report, the engineer scrolls to the bottom and selects:
Complete Job
The Job is then completed in the system.
The final sequence is:
Complete → Service Report → Review → Complete Job
23. Automatic Invoice Generation
Once the engineer completes the Job, the downstream automation generates the applicable invoice automatically.
The overall process therefore becomes:
Engineer Completes Job
↓
Job Status Updated to Completed
↓
Service Report Finalized
↓
Invoice Automatically Generated
This eliminates the need for the engineer or Dispatcher to manually create the invoice after Job completion, assuming the required configuration and billing conditions are satisfied.
24. Complete End-to-End Process
Dispatcher Flow
Job Created
↓
Job Appears in Queue
↓
Dispatcher Reviews Job
↓
Open Job / Select Dispatch
↓
Dispatch Board Opens
↓
Review Engineer Availability & Occupancy
↓
Drag & Drop Job / Select Available Time Slot
↓
Job Assigned to Service Engineer
↓
Dispatcher’s Primary Dispatch Activity Completed
Service Engineer Flow
Job Appears on Mobile
↓
Assigned
↓
Clock In – Start Daily Working Time
↓
In Route
↓
Travel to Customer Site
↓
On Site
↓
More → Debrief → Pre-Job
↓
Complete Required Pre-Job Questions
↓
Upload Required Pre-Job Photos
↓
Submit Pre-Job Checklist
↓
Return to Job
↓
Obtain Dispatch Confirmation if Required
↓
Perform Service Work
↓
More → Debrief → Post-Job
↓
Complete Required Post-Job Questions
↓
Upload Required Post-Job Photos
↓
Submit Post-Job Checklist
↓
More → Upload Photos
↓
Upload Additional Photos in Batches of Up to 10
↓
More → Complete
↓
Review Service Report
↓
No Customer/Engineer Signature Required
↓
Select Complete Job
↓
Job Completed
↓
Invoice Automatically Generated
↓
Clock Out – End Daily Working Time
25. Roles and Responsibilities
| Activity | Dispatcher | Service Engineer |
|---|---|---|
| Review Jobs | ✓ | |
| Monitor Queue | ✓ | |
| Open Job | ✓ | ✓ |
| Dispatch Job | ✓ | |
| Review Engineer Availability | ✓ | |
| Assign Job | ✓ | |
| Receive Assigned Job | ✓ | |
| Clock In | ✓ | |
| Update to In Route | ✓ | |
| Update to On Site | ✓ | |
| Complete Pre-Job Checklist | ✓ | |
| Upload Required Pre-Job Photos | ✓ | |
| Perform Service Work | ✓ | |
| Complete Post-Job Checklist | ✓ | |
| Upload Required Post-Job Photos | ✓ | |
| Upload Additional Photos | ✓ | |
| Review Service Report | ✓ | |
| Complete Job | ✓ | |
| Invoice Generation | Automated | Automated |
| Clock Out | ✓ |
26. Key Business Rules
Job Assignment
- Newly created Jobs are initially available in the dispatch queue.
- The Dispatcher is responsible for assigning the Job to an appropriate Service Engineer.
- Jobs can be dispatched either from the Job itself or from the Dispatch Board.
Dispatch Board
- The Dispatcher can use the engineer’s daily occupancy to identify available time slots.
- Jobs can be assigned using drag-and-drop or by selecting an available slot.
Time Capture
- The Service Engineer clocks in at the beginning of the working day.
- The Service Engineer clocks out at the end of the working day.
- Daily working time is captured through this process.
Job Status
The key Job statuses are:
Assigned → In Route → On Site → Completed
Pre-Job Checklist
- All configured questions are mandatory.
- Required photo upload fields must be completed.
- Each individual photo upload field accepts one photo.
- The checklist must be submitted before proceeding.
Post-Job Checklist
- All configured questions are mandatory.
- Required photo upload fields must be completed.
- Each individual photo upload field accepts one photo.
- The checklist must be submitted after the service work is completed.
Additional Photos
- Additional photographs can be uploaded through the More menu.
- Up to 10 photos can be uploaded in one batch.
- Multiple batches can be uploaded when more photographs are required.
Job Completion
- The Service Report is generated/accessed as part of the completion process.
- Customer signature is not required.
- Engineer signature is not required.
- The engineer selects Complete Job to finalize the Job.
- Invoice generation occurs automatically after Job completion.
27. Daily Operating View
From a practical daily perspective, the process can be summarized as follows.
Dispatcher
Start Day → Review Queue → Review Jobs → Check Engineer Occupancy → Dispatch Jobs → Monitor Assignment/Status
Service Engineer
Clock In → Review Assigned Jobs → In Route → On Site → Pre-Job Checklist → Perform Work → Post-Job Checklist → Upload Additional Photos → Review Service Report → Complete Job → Clock Out
This creates a clear separation of responsibilities while maintaining visibility of the Job from initial dispatch through final completion and billing.